| Prev: Introduction | Current: Installation | Next: SQL Queries |
This is the second blog in the series of basic database training for non-programmers. We have already completed fundamentals of database in the previous blog. In this one, we will install a MySQL database for our next training steps.
We will be installing MySQL and DBeaver. DBeaver needs a version of Java runtime. We will install JDK, then MySQL and finally DBeaver. All of these we will install in one directory as portable software. When not needed we will delete this directory and be done.
Install JDK
We will install Amazon Corretto v11 as JDK. First let’s create a directory in our C:\ drive called train. Now download Corretto from Amazon.
Downloads for Amazon Corretto 11 – Amazon Corretto
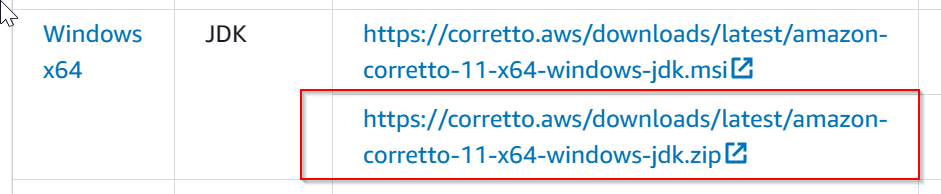
I am using Windows for this, because that is what most non developers use. Unlike every other blog, for this, I will use windows to develop. Download the .zip file and not the .msi file.
After download, unzip this file to C:\train\ folder. You should see a folder created as C:\train\jdk11.0.19_7 (your directory name may be different based on the downloaded version).
Install MySQL Community server
Search for MySQL community server download link. For me, I got the following link.
MySQL :: Download MySQL Community Server
You will need to download the .zip file again. See image below for selection,

Now unzip this also under C:\train. At this time, train should have two directories as follows,
- C:\train\jdk11.0.19_7
- C:\train\mysql-8.0.33-winx64
Update Environment variables
Open a Notepad and copy the following two lines to it. Save the file as C:\train\setpath.bat
@echo off
set PATH=C:\train\jdk11.0.19_7\bin;C:\train\mysql-8.0.33-winx64\bin;%PATH%
Now open up a new Command prompt and run the batch file followed by the two commands described below.

If you see the correct versions for all of them, installation is successful.
Initialize MySQL
Now that MySql installed, we will start initializing it. Type the following commands.
c:\>cd c:\train
c:\train>md data
c:\train>mysqld --initialize --console --datadir .\data
You should see an output as below for the last command.
2023-05-30T00:00:56.113818Z 0 [System] [MY-013169] [Server] C:\train\mysql-8.0.33-winx64\bin\mysqld.exe (mysqld 8.0.33) initializing of server in progress as process 12860
2023-05-30T00:00:56.133088Z 1 [System] [MY-013576] [InnoDB] InnoDB initialization has started.
2023-05-30T00:00:56.723243Z 1 [System] [MY-013577] [InnoDB] InnoDB initialization has ended.
2023-05-30T00:00:57.664994Z 6 [Note] [MY-010454] [Server] A temporary password is generated for root@localhost: ._u9343D=OPF
Check the last line generated and get the password for root account. This is a very important step. This password will be needed in subsequent steps. The line looks like this: A temporary password is generated for root@localhost: <password_here>.
Install DBeaver
Next we will install DBeaver community edition. Use the following link to find this software,
Again, download the Windows (zip) version of the software. Remember what we are trying to do is install everything portably so that when we are done, we will just delete the C:\train directory and there will be no more mess left to deal with in user directory or windows registry. If you do not mind the mess, you are free to use the .msi versions of the software installers.
After downloading, unzip this file also in C:\train directory. At this time your directory should have the following structure.
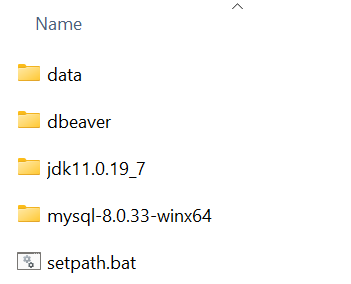
This is the complete installation for everything that is needed for training.
Start MySQL and Create Users
Now we will wear a developer hat and learn some commands for starting/ stopping MySQL.
Start MySQL
  C:\> mysqld --datadir .\data

Stop MySQL
  C:\> mysqladmin -u root -p shutdown
The password that MySQL gave is a onetime use password. So, let’s change it. Open a new command prompt, go to C:\train, run the batch file to set path and key in the following command (mysql -u root -p). Command with output is shown below. You will need to enter the onetime use password to login.
C:\train> mysql -u root -p
Enter password: ************
Welcome to the MySQL monitor.  Commands end with ; or \g.
Your MySQL connection id is 16
Server version: 8.0.33

Copyright (c) 2000, 2023, Oracle and/or its affiliates.

Oracle is a registered trademark of Oracle Corporation and/or its
affiliates. Other names may be trademarks of their respective
owners.

Type 'help;' or '\h' for help. Type '\c' to clear the current input statement.

mysql>
Next we set the new root password. See below.
mysql> alter user 'root'@'localhost' identified by 'Tr@in1ng';
mysql> exit;
This should change the root password and give you a custom password that you set..
Let’s use the Start MySQL command to start the server now. Next execute C:\train\dbeaver\dbeaver.exe.
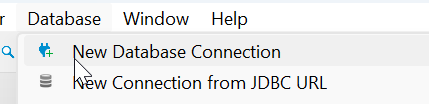
Start a New Database Connection

Next we key in the password and do a Test Connection. If you get an error as “Public Key Retrieval Not Allowed”, click driver properties, set the key provided in next image to TRUE and come back here,
Finally, click Finish to Save.
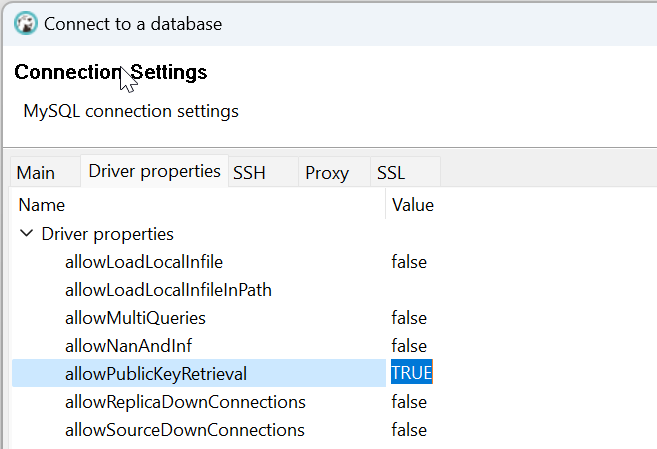
Set this value to TRUE if you get Public Key Retrieval failed.
Now let’s import some dummy data into the database. You can follow the steps here to install Employee table.
MySQL :: Employees Sample Database :: 3 Installation
We will just make one small change to the commands. Replace the data loader with following:
C:\train> mysql -u root -p -t < employees.sql
When complete, refresh the database connection in DBeaver and you should see all the tables loaded.

Conclusion
That completes all installations required. We will start with the queries in the next blog. In this blog we have installed JDK, MySQL and DBeaver in a portable manner. We have also added a sample database to MySQL so that we can work on that in the next blog. Ciao for now!