Today we will do a quick blog on image segmentation using one of the pre-trained PyTorch segmentation models. What we will try to achieve here is extracting a person (full/partial torso) and overlay it on a different background. I have taken couple of photos from scop.io for this project. Let’s start with definition of Image Segmentation.
What is Image Segmentation
Image Segmentation is a technique that is used for partitioning an image segregating pixels belonging to specific classes. For example, if I have a photo of a person with her dog, and I have a model trained on identifying dogs and person, I can run the model on this image and pixels under the dog and the person can be separately selected.
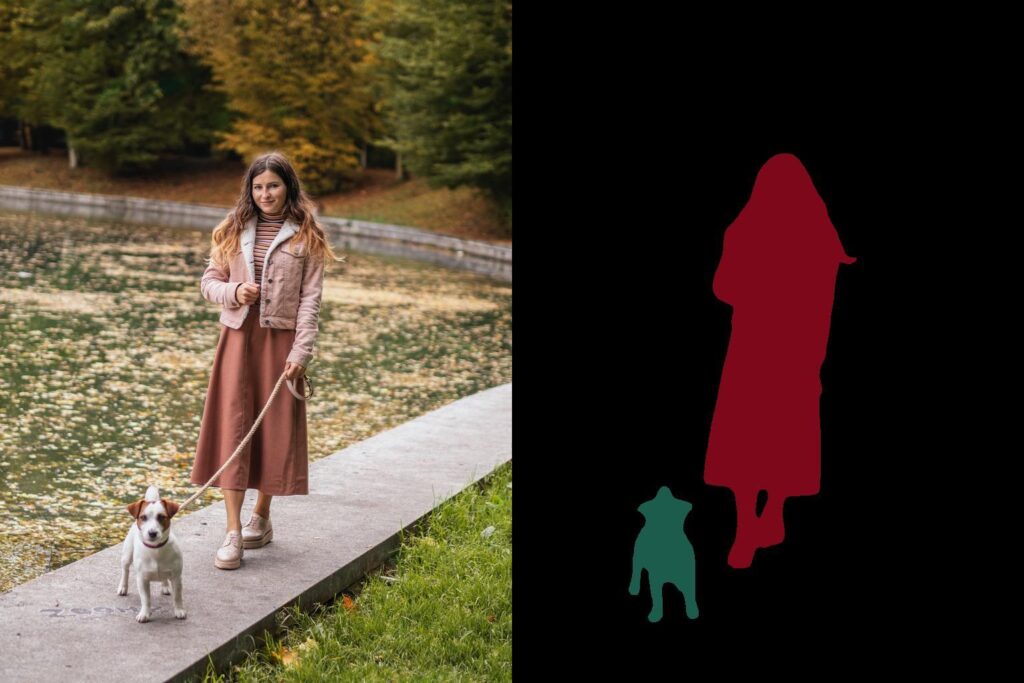
Image above shows the simplest form of segmentation. This is known as semantic segmentation. A semantic segmentation assigns a semantic class to each pixel of the image. It does not provide any other context for the image and does not understand anything else about the image in question. There are other variations of segmentations based on what and how they identify things, however, that is not relevant in this discussion and will not be taken up.
Image Segmentation vs Object Detection
Image segmentation is a much more advanced process as compared to object detection. Object Detection also works on classes. However, when object detection models are trained, they are only trained to detect if an object exists. Eventually they will create a bounding box around the class where the object was detected. So, if we had processed the image above, we would have two different bounding boxes. One bounding box would have been around the girl and the other around the dog. Image segmentation provides more precise detection, and works on pixel level, than what object detection can provide.
One more term comes to mind at this time, scene detection. We use scene detection to tell us what this image may be. Let’s take an example. If we are provided a scene from an airport, using scene detection, we will look for patterns in the image and tell that this looks like a airport setting. This works on a much more higher level.
Now that we have some basics out of the way, we will go to the problem we are solving today.
The Problem
I have written about object detection or object classification multiple times in this blog. I have also written about image segmentation earlier using ml5.js. You can refer to this old blog here. Today we will do the same project, but instead of video, we will work with images. We will also use torchvision to solve this problem.
So what problem are we solving? Imagine that you are on a video call and you do not want to show the background – or replace background with a different image. What do you do? You always wanted to go to Bali, but then the photo that you have is when you visited your local park. How do you create a convincing image where you are enjoying on the beach sands of Bali? We can solve both of this problems using semantic segmentation. In this blog we will solve the second problem. Video is an extension of an image, so when we solve for photo, video is solved automatically.
Tools of the Trade
Let’s define now what we will use in this program. Like we said, PyTorch and associated torchvision. We wil also use pillow (PIL) for image manipulation. Of course in some places we are also using Numpy. Let’s document it below for convenience.
import gc
import torch
import numpy as np
from PIL import Image
import torchvision.utils as utils
import torchvision.transforms as transforms
from torchvision.models.segmentation import fcn_resnet50, FCN_ResNet50_Weights
We will use fcn_resnet50 model from torchvision. What does that mean?
The Model
According to PyTorch documentation, fcn_resnet50 is constructed of a Fully-Convolutional Network model. The backbone used in case of fcn-resnet50 is ResNet-50. The pre-trained models are trained on a subset of COCO train2017, on the 20 categories that are present in the Pascal VOC dataset.
Their accuracy of the pre-trained models evaluated on COCO val2017 dataset is:
| Model Structure | Model IOU | Global Pixelwise Accuracy |
| fcn_resnet50 | 60.5 | 91.4 |
From PyTorch documentation, this is the pipeline for the resnet model we are talking about here,
FCN_ResNet50_Weights.COCO_WITH_VOC_LABELS_V1.transforms and perform the following preprocessing operations: Accepts PIL.Image, batched (B, C, H, W) and single (C, H, W) image torch.Tensor objects. The images are resized to resize_size=[520] using interpolation=InterpolationMode.BILINEAR. Finally the values are first rescaled to [0.0, 1.0] and then normalized using mean=[0.485, 0.456, 0.406] and std=[0.229, 0.224, 0.225]
Start Implementing
def __init__(self) -> None:
        self.max_classes = 21

        # Is MPS available?
        if torch.backends.mps.is_available():
            self.gpu = True
        else:
            self.gpu = False

        # Resnet Model on COCO for image segmentation
        mapping = FCN_ResNet50_Weights.COCO_WITH_VOC_LABELS_V1.meta["categories"]
        self.idx_person = mapping.index("person")

        self.fcn_resnet = fcn_resnet50(weights=FCN_ResNet50_Weights.COCO_WITH_VOC_LABELS_V1)
        if self.gpu:
            self.fcn_resnet.to("mps")
        self.fcn_resnet.eval()
Starting Line #4, we are trying to determine if I am running on my MacBook (that does support metal backend). I normally don’t check for device as I do know that installed PyTorch does support metal backend. So as soon as they are loaded, I move model and input to GPU. Then we are trying to determine the index for “person” in – part of Pascal VOC dataset.
Given below is the list of classes in Pascal VOC dataset.
['__background__', 'aeroplane', 'bicycle', 'bird', 'boat', 'bottle', 'bus', 'car', 'cat', 'chair', 'cow', 'diningtable', 'dog', 'horse', 'motorbike', 'person', 'pottedplant', 'sheep', 'sofa', 'train', 'tvmonitor']
Interesting part starts at Line #14. Here we are loading the model and initializing it. Finally we also move the model to GPU.
Extract Person Mask
def extract_person_mask(self, aframe):
        # Get the tensors
        tfimg = transforms.ToTensor()(aframe)
        if self.gpu:
            tfimg = tfimg.to("mps")

        # Preprocess the image
        preimg = FCN_ResNet50_Weights.COCO_WITH_VOC_LABELS_V1.transforms(resize_size=None)
        prebat = preimg(tfimg).unsqueeze(dim=0)
        if self.gpu:
            prebat = prebat.to("mps")

        # Pass to the Semantic Segmentation model
        sem_preds = self.fcn_resnet(prebat)
        gc.collect()

        preds = sem_preds['out']
        masks = preds.softmax(dim=1)[0]
        return masks[self.idx_person].cpu()  # 15 is the index as person
Okay, so this method extracts person pixels from the image and creates a mask that can be used later. Let’s see what we are doing here. Of course, the first thing we do is load the image as tensor. We do not do any transformations, but ideally we could have resized it to 224x224px, applied some mean and standard deviation to it. But then, my images are all 1024px on the larger side, greater than 224px, so we are fine for now.
Starting line #8, we are doing a forward pass through the pipeline. We do a unsqueeze as the pipeline does expect a batch.
Now we collect the output from “out”. This model also fills in a collection called “aux”, but we ignore it. Lastly, we just extract the mask for the person, move it out of GPU and return.
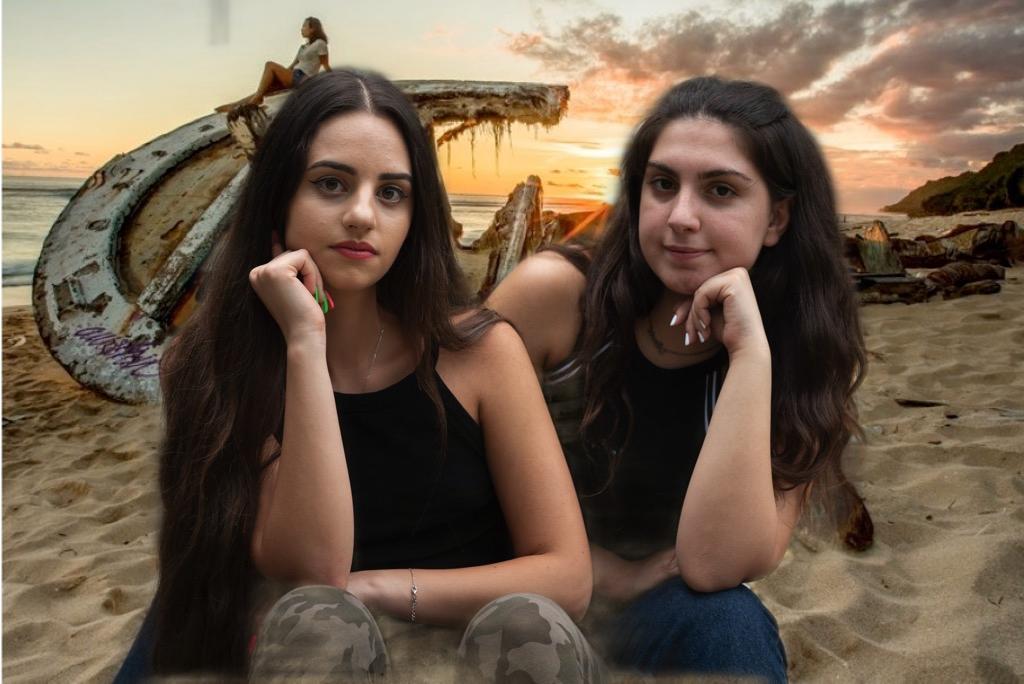
The mask itself does not give us the full idea, as seen from the image we have provided before. Instead what we will do it create a composite using this mask and a different background. So, eventually following is what we want to achieve.

Image Compositing
Look at the image above. I have two girls sitting in a park. I also have an image of a shipwreck in Bali. Wouldn’t it be wonderful if I can move these girls near the shipwreck? That’s what is the third image. Let’s see how to achieve this.
So, we were already able to get a mask for the two girls from the code above. Let’s see how that looks like.
def save_masked_image(self, outfile, img):
        fgimg = Image.open(img)
        mask = self.extract_person_mask(fgimg)

        tfimg = transforms.ToTensor()(fgimg)
        final_img = mask * tfimg
        utils.save_image(final_img, outfile)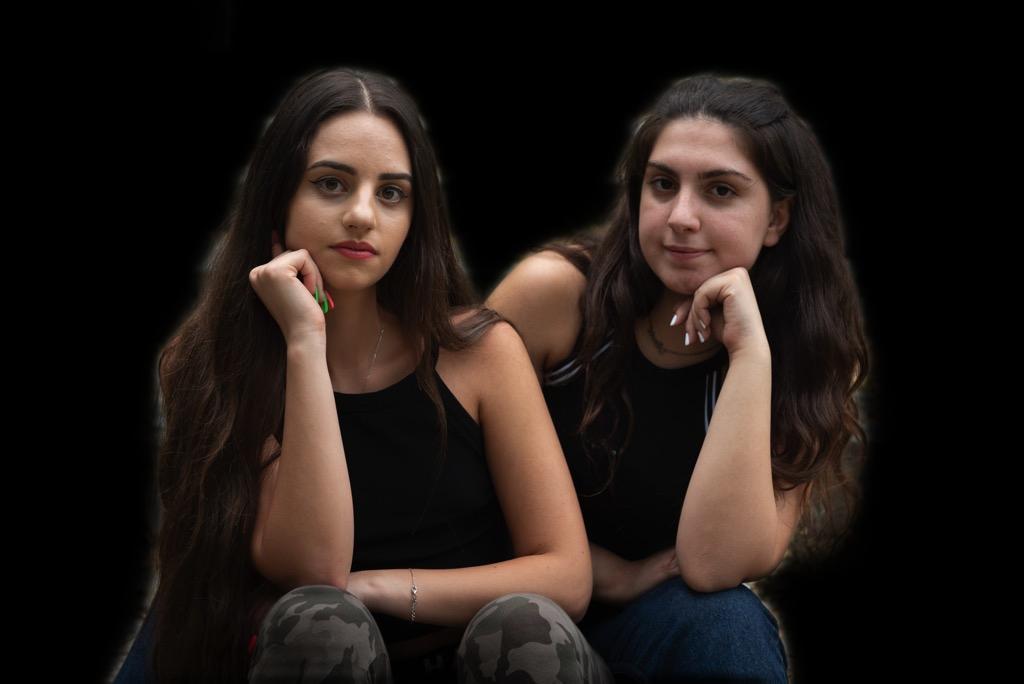
That is nearly a clean extraction if I may say so :). Having that, next step is to just add that on the background image. We will use pillow for that part of the task.
def merge_image(self, outfile, imgfg, imgbg, person_mask):
        # We know mask is a tensor here, so will create an Image
        mask_image = transforms.ToPILImage()(person_mask)
        # Resize BG to FG
        w, h = imgfg.size
        imgbg = imgbg.resize((w, h))
        img = Image.composite(imgfg, imgbg, mask_image)
        img.save(outfile)
We will resize the background image to be the same size as the mask. We know that mask was generated from foreground image, so there is no need to resize them. Finally we just create a composite with the provided mask. Final image is what we want.
Not much of an effort, isn’t it?
Conclusion
This is the basic implementation for image segmentation. My target was really video segmentation, so this was just the beginning. A lot of these things I had converted from OpenCV to Pillow. Hope you find this useful. Ciao for now!