
I need to create a WebRTC library that can be used from web. Also, I will need a client that sits on server side as well. For all of these I will need a WebSocket server sitting behind the scene to communicate across to all connected clients.
This project is just a bare bones socket server sitting on spring framework. It does not use STOMP, neither does it use SockJS.
It is not mandated that we use WebSocket for WebRTC communication, but it has kind of become a de-facto standard to implement that way as socket connections can be kept open for a long term. We will not talk about WebRTC here, but just deal with WebSocket.
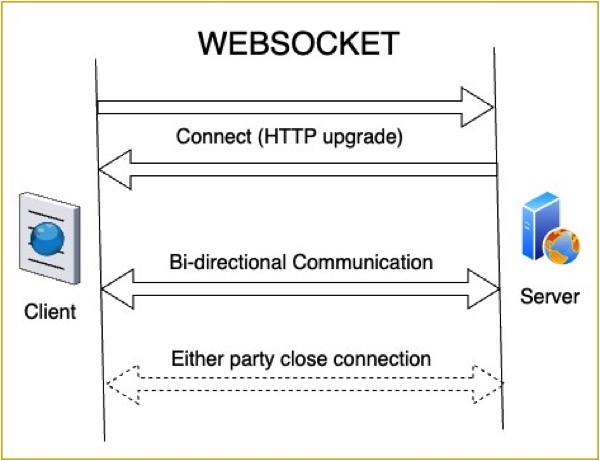
What is WebSocket
WebSocket is a protocol that allows for two-way full duplex communication over a single transmission channel. It is a stateful protocol which just means it stays alive unless it is terminated by either of the parties.
WebSocket is used when real time communication is required. It is also used in chat applications and gaming.In fact WebSocket has become the standard for these.
In this blog, I will just show how to create a very simple WebSocket server and client in Spring and browser.
Server Code
We will start with dependencies in pom.xml. There is really just one dependency needed that will pull other dependencies in.
<dependency>
	<groupId>org.springframework.boot</groupId>
    <artifactId>spring-boot-starter-websocket</artifactId>
</dependency>
Let’s start with the server configuration. From Spring perspective, what really does the magic is adding @EnableWebSocket annotation. Rest of the code is just to define the handler endpoint for this socket connection. For this, we will just use /socket endpoint.
import org.springframework.beans.factory.annotation.Autowired;
import org.springframework.context.annotation.Configuration;
import org.springframework.lang.NonNull;
import org.springframework.web.bind.annotation.CrossOrigin;
import org.springframework.web.socket.config.annotation.EnableWebSocket;
import org.springframework.web.socket.config.annotation.WebSocketConfigurer;
import org.springframework.web.socket.config.annotation.WebSocketHandlerRegistry;

@CrossOrigin(maxAge = 3600)
@Configuration
@EnableWebSocket
public class SocketServerConfig implements WebSocketConfigurer {

    @Autowired
    private TextSocketServer socketHandler;

    @Override
    public void registerWebSocketHandlers(final @NonNull WebSocketHandlerRegistry registry) {
        registry.addHandler(socketHandler, "/socket").setAllowedOriginPatterns("*");
    }
}
We set cross origin to allow any pattern. Rest of these are boilerplate code. Now, what about the handler that we used there? Let’s check it out.
import java.util.Collections;
import java.util.HashSet;
import java.util.Set;

import org.springframework.lang.NonNull;
import org.springframework.stereotype.Controller;
import org.springframework.web.socket.CloseStatus;
import org.springframework.web.socket.TextMessage;
import org.springframework.web.socket.WebSocketSession;
import org.springframework.web.socket.handler.TextWebSocketHandler;

@Controller
public class TextSocketServer extends TextWebSocketHandler {

    final Set<WebSocketSession> sessions = Collections.synchronizedSet(new HashSet<>());

    @Override
    public void handleTextMessage(@NonNull final WebSocketSession session, @NonNull final TextMessage message)
    throws Exception {

        for (final WebSocketSession webSocketSession : sessions) {
            if (webSocketSession.isOpen() && !session.getId().equals(webSocketSession.getId())) {
                webSocketSession.sendMessage(message);
            }
        }
    }

    @Override
    public void handleTransportError(@NonNull final WebSocketSession session, @NonNull final Throwable exception) {
        exception.printStackTrace();
    }

    @Override
    public void afterConnectionEstablished(@NonNull final WebSocketSession session) throws Exception {
        sessions.add(session);
    }

    @Override
    public void afterConnectionClosed(@NonNull final WebSocketSession session, @NonNull final CloseStatus status) {
        sessions.remove(session);
    }
}
A lot of code, but still boilerplate code. We are just overriding some methods from TextWebSocketHandler. Spring provides two different classes for handling Text vs Binary messages. Since, we would be dealing with Text only we have put TextWebSocketHandler. Let’s check what these methods are,
- handleTextMessage: called when a text message is received.
- handleTransportError: called on error.
- afterConnectionEstablished: called when a new connection is established.
- afterConnectionClosed: called when a connection is disconnected.
That’s it. We are done with the socket server. We can now add a client to connect to this server.
Spring Client
Spring Client is as easy to build like the server. Again we only have two components. The configuration and the client code. It will look very similar to what server code looks like.
import org.springframework.context.annotation.Bean;
import org.springframework.context.annotation.Configuration;
import org.springframework.web.bind.annotation.CrossOrigin;
import org.springframework.web.socket.WebSocketHandler;
import org.springframework.web.socket.client.WebSocketClient;
import org.springframework.web.socket.client.WebSocketConnectionManager;
import org.springframework.web.socket.client.standard.StandardWebSocketClient;

@CrossOrigin(maxAge = 3600)
@Configuration
public class SocketClientConfig {

    @Bean
    public WebSocketHandler webSocketHandler() {
        return new TextSocketClient();
    }

    @Bean
    public WebSocketClient webSocketClient() {
        return new StandardWebSocketClient();
    }

    @Bean
    public WebSocketConnectionManager wsConnection() {

        final WebSocketConnectionManager mgr = new WebSocketConnectionManager(
               webSocketClient(),
               webSocketHandler(),
               "ws://127.0.0.1:4890/socket"
       );
       mgr.setAutoStartup(true);
       return mgr;
    }
}
Here what is happening is that we are just connecting to the server socket we just created. Again, pretty boilerplate code for most part of it. The only implementation is the Text Socket override to handle how we to respond to received messages. Let’s see what that does.
import org.springframework.lang.NonNull;
import org.springframework.stereotype.Controller;
import org.springframework.web.socket.CloseStatus;
import org.springframework.web.socket.TextMessage;
import org.springframework.web.socket.WebSocketSession;
import org.springframework.web.socket.handler.TextWebSocketHandler;

@Controller
public class TextSocketClient extends TextWebSocketHandler {

    @Override
    public void handleTextMessage(@NonNull final WebSocketSession session, @NonNull final TextMessage message)
    throws Exception {
        System.out.println("Client Received: " + message.getPayload());
        session.sendMessage(new TextMessage("Java Client: " + message.getPayload()));
    }

    @Override
    public void handleTransportError(@NonNull final WebSocketSession session, @NonNull final Throwable exception) {
        exception.printStackTrace();
    }

    @Override
    public void afterConnectionEstablished(@NonNull final WebSocketSession session) throws Exception {
        System.out.println("Connection Established...");
    }

    @Override
    public void afterConnectionClosed(@NonNull final WebSocketSession session, @NonNull final CloseStatus status) {
        System.out.println("Connection Closed...");
    }
}
This is very similar to what we had for server. We are handling individual methods and defining what behavior we want from each of them.
Web Client
We use WebSockets primarily from browser. So for completeness, we do have to write a code that will Open a connection from browser, send and receive messages. We do not bother about the UI part of it, and I will just put everything in a simple form.
Let’s start with the HTML form part of it.
<form>
    <input id="url" type="url" value="ws://127.0.0.1:4890/socket" required>
    <button id="open">Open</button>
    <button id="close">Close</button>
    <br/>
    <input id="message" type="text" placeholder="Enter a message">
    <button id="send">Send</button>
    <br/>
    <textarea id="log" rows="10" cols="80" readonly></textarea>
</form>
And the JavaScript part of it, again, simplest code,
let ws = null;
if (document.readyState === "complete") {
  onOpenClick = function() {
    const url = document.getElementById('url').value;
    ws = new WebSocket(url);
    ws.onopen = function() {
      log('open');
    }
    ws.onclose = function() {
      log('close');
    }
    ws.onmessage = function(event) {
      log('Web Client: ' + event.data);
    }
    ws.onerror = function(event) {
      log('error: ' + event.data);
    }

    return false;
  }
  onCloseClick = function() {
    ws.close();

    return false;
  }
  log = function(message) {
    const log = document.getElementById('log');
    log.value += message + '\n';
    console.log(message);
  }
  document.getElementById('open').onclick = onOpenClick;
  document.getElementById('close').onclick = onCloseClick;
  document.getElementById('send').onclick = function() {
    ws.send(document.getElementById('message').value);
    return false;
  }
}
That’s all the code that we have. We open a WebSocket from JavaScript, and handle required events. For this, we are just logging everything needed.
See it Run
We will execute the server and the client, and on a browser will open up the HTML page. Following sequence of events happen,
- We open a socket connection
- We send a message over the socket (in this case Hello Socket!)
- Java Client receives it and prints to console
- Java Client sends the message back
- Web Client receives the message and prints it in text area
- We finally close the connection

On the left is the browser logs. On the right is Java logs. As seen in the highlighted items, Java received the message, and sent it back to Web which then it printed.
Conclusion
Not too challenging, right? Pretty much boilerplate codes and you have a working WebSocket program. Hope you found this useful. Ciao for now!