I was planning to create a frontend to draw my own masks so that I can test out inpainting using various available models on huggingface. We have models like Stable Diffusion, Kandinsky or Aura Flow that we can try out. So I started looking out for a GUI toolkit, and found Toga, a toolkit I had never used before.
I didn’t want to use QT, too heavy toolkit, tkinter was out because I am using MacOS and the version that ships with it is obsolete. I have used SimpleGUI before, but it changed it’s license as well. Anyway, long story short, I decided to implement using Toga.
Let’s talk Toga for a bit before we delve into the library.
About Toga
Toga is another of those GUI toolkits that is a new kid on the block. It differentiates itself from other toolkits in the sense that underlying subsystem is always native. Toga architecture is three layered. On the top is the API layer that we can interact with and write our applications. Underneath that will be OS specific libraries, for example on MacOS an implementation of cocoa is used. Finally the third layer is OS native layer.
I know that is about as rushed of an introduction as can be, but that is enough for now.
Final Design
Like I said what I wanted to build is a tool that can help create a mask, and using the image and the mask call one of the models for inpainting. I ran into a lot of issues, but finally what I have looks like a mess. But whatever it is, it works. We will discuss the mess as we go through this blog.
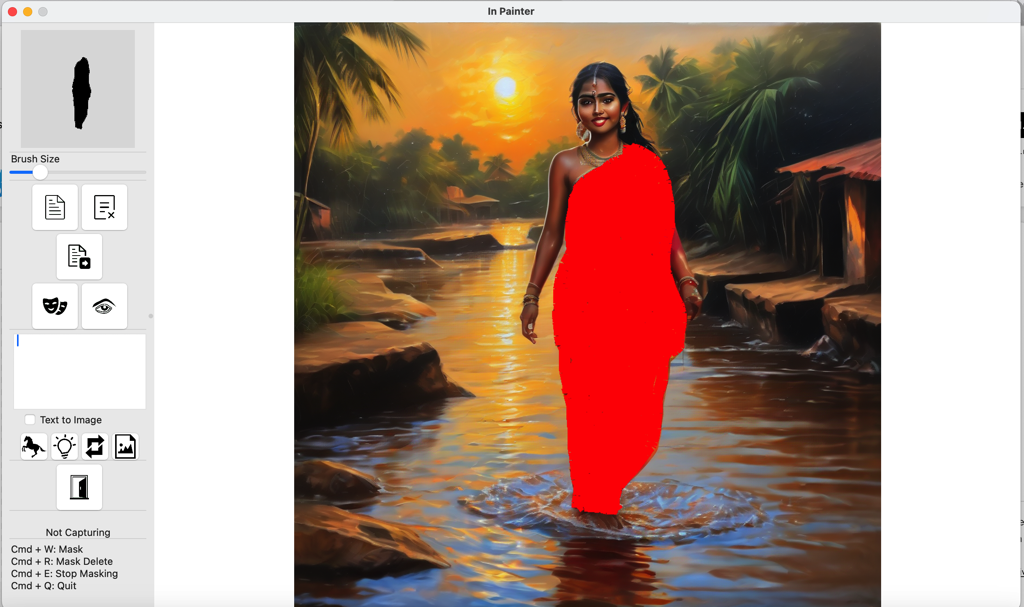
So, what do we have here?
- We have an image area that shows the image
- In this image area, we can draw/ erase mask (see the red highlighted mask)
- On the left we have a clumsy menu, with a canvas on top tracking all our pen moves (mini mask view)
- Below that we a lot of widgets that will be used to work on image
- Following widgets are drawn
- A brush size manipulation tool (goes from 1 to 100, default 20)
- Open Image button
- Close Image button
- Export Mask button
- View Mask button
- View Original Image button
- Textarea for writing prompt
- Checkbox to indicate Text to Image or Image Inpainting
- Stable Diffusion button
- Auraflow button
- Flux button
- Kandinsky button
- Exit button
Ok, in the next section, let’s draw this UI using Toga. I do not have a complaint on the toolkit or the layout capabilities that Toga gives. I think it is sufficient. I do feel that fixed layout will probably help, but I understand the limitation when a toolkit has to support multiple platforms including mobile. But then a developer knows what he is building for. Why not allow developer to select platforms that he wants to support?
Installation
Before we start to go further into the deeps, let’s install the modules that we will eventually need. For this project, I used the three additional modules (excluding toga).
- asyncio, for Asynchronous calls, recommended by Toga
- Toga, of course we are talking about this
- Pillow, python imaging library
- Pynput: this is the mouse capture library
Here are the commands to install all of them. asyncio comes with Toga.
$ python -m venv myenv
$ . ./myenv/bin/activate
$ pip install -U pip
$ pip install wheel
$ pip install toga
$ pip install pillow
$ pip install pynput
We have installed all dependencies. We are now ready to start.
Building the UI
I have the sketch on paper, and now time to render it using Toga toolkit. I prefer to have buttons that displays small icons and also text. Here buttons support either one of them, not both. You can have Commands of course supporting that, but those are not buttons. They are used more for creating menus. So, I stick with icon only buttons. At least I may want to see a hover over text? Well no luck there either. Go use a Command. So, remind me again, why do I have a button widget?
Let’s start by defining the left container.
# Screen size
(scwidth, scheight) = self.screens[0].size
print(f"Screen -> Width : {scwidth:.2f}, Height: {scheight:.2f}")

# Left container items
self.canvas = toga.Canvas()
self.canvas.style.update(width=150, height=150, padding_top=5)

canvas_box = toga.Box(children=[self.canvas], style=Pack(background_color='#DDDDDD', padding=5))

button_fileopen = toga.Button(icon=toga.Icon('rsc/file.png'), on_press=self.button_fileopen_action,
                      style=Pack(width=60, height=60, padding_top=5, padding_left=5))
# Other buttons skipped here
self.slider = toga.Slider(range=(1, 100), value=20, on_change=self.slider_change)
self.llminput = toga.MultilineTextInput(style=Pack(padding_top=5, padding_left=5))
self.labpix = toga.Label("          Not Capturing", style=Pack(padding_top=20, width=160))

# Layout now
left_container = toga.Box(style=Pack(direction=COLUMN, alignment=CENTER, width=180, padding_left=10, padding_top=5))
left_container.add(canvas_box)
left_container.add(toga.Divider())
left_container.add(toga.Label("Brush Size"))
left_container.add(self.slider)
left_container.add(toga.Divider())
box_row1 = toga.Box(style=Pack(direction=ROW))
box_row1.add(button_fileopen)
box_row1.add(button_fileclose)
left_container.add(box_row1)
left_container.add(button_fileexport)
box_row2 = toga.Box(style=Pack(direction=ROW))
box_row2.add(button_mask)
box_row2.add(button_view)
left_container.add(box_row2)
left_container.add(toga.Divider())
left_container.add(self.llminput)
box_row3 = toga.Box(style=Pack(direction=ROW))
box_row3.add(button_stdiff)
box_row3.add(button_staura)
left_container.add(box_row3)
left_container.add(toga.Divider())
left_container.add(button_exit)
left_container.add(toga.Divider())
left_container.add(self.labpix)
left_container.add(toga.Divider())
label_container = toga.Box(style=Pack(direction=COLUMN, alignment=CENTER, padding_top=5))
label_container.add(toga.Label("Cmd + W: Mask"))
label_container.add(toga.Label("Cmd + R: Mask Delete"))
label_container.add(toga.Label("Cmd + E: Stop Masking"))
label_container.add(toga.Label("Cmd + Q: Quit"))
left_container.add(label_container)
Let’s get the center container now.
# Center container items
self.imgarea = toga.ImageView(image='./rsc/mask.png', style=Pack(flex=1))
center_container = toga.ScrollContainer()
center_container.content = self.imgarea
Adding both of these together,
split = toga.SplitContainer()
split.content = [(left_container, 1), (center_container, 6)]
The numbers in split container specifies weight. So, in this case the right container ideally should be 6 times the size of left container.
Finally let us add some command buttons. We will not draw these, but they should automatically get added to MacOS top menu bar.
cmd_capture_mouse_A = toga.Command(
       self.command_start_mask,
       text='Start Masking',
       shortcut=toga.Key.MOD_1 + toga.Key.W
)
cmd_capture_mouse_S = toga.Command(
       self.command_start_revmask,
       text='Delete Masking',
       shortcut=toga.Key.MOD_1 + toga.Key.R
)
cmd_end_capture_mouse = toga.Command(
       self.command_end_mask,
       text='End Mouse Capture',
       shortcut=toga.Key.MOD_1 + toga.Key.E
)
cmd_quit = toga.Command(
       self.command_quit,
       text='Quitter',
       shortcut=toga.Key.MOD_1 + toga.Key.Q
)
self.commands.add(cmd_capture_mouse_A, cmd_capture_mouse_S, cmd_end_capture_mouse, cmd_quit)
With everything in place, we just show the window.
self.main_window = toga.MainWindow(title="In Painter",
       position=(50, 30),
       size=(scwidth - 100, scheight - 100),
       resizable=False, minimizable=True)
self.main_window.content = split
self.main_window.show()
Canvas and ImageView
The main view where we display the image is an ImageView widget. When a ImageView lies within a ScrollView, it just resizes the image to take up the entire space of ScrollView. I found no way of changing this behavior. Maybe there is a parameter to do that which is not documented? Next up I have to get mouse press events in ImageView. No luck here either, it does not support mouse press events (actually no events at all). So, looking for alternatives, I find Canvas that does support mouse events. But hard luck here too. It only supports vectors. There is no option of setting a background bitmap. Which simply means I cannot use it. Stuck again!
I finally decided to still use ImageView and have a different library handle mouse events for me. I have pynput running in a background thread. Before we go to pynput, let’s see how we can have a background thread running. Toga relies on asyncio for all thread processing. We will also rely on the same.
"""
Receiving a reference to brush value instead of value so we can update it
"""
async def do_background_task(self, brush_size):
    while True:
      # Codes
      await asyncio.sleep(0.1)

def startup(self):
  asyncio.create_task(self.do_background_task(self.brush_value))
That’s kind of what is needed to create a background thread. Now this will keep on triggering every 100ms.
To trap mouse position, we will use the pynput. There is a reason why we will not use mouse events (like keypress etc.). That needs a system wide hook installed to work properly. I decided to live without it. So, I won’t check mouse clicks at all in this case. My base workflow that I thought changed, but then I am the only one using this application. Let’s see ho pynput works.
def startup(self):
    # Grab Mouse
    self.mouse = Controller()

async def do_background_task(self, brush_size):
    (mousex, mousey) = self.mouse.position
There is a challenge with this as well. This pixel positions are w.r.t. the screen. But how do we know what is the X, Y for the image area in global window stack? Umm… don’t know. So, I fixed the window to open up at 100, 100 pixels, and calculated that if left at that point, I will have the X, Y for image area at 250, 60 pixels approximately. Again, compromise, but works for what I am trying to do.
Now that we know where in Image Area world mouse is being clicked, I can easily lay mask under that.
Masking Challenge
We already know the pixels, so mask should be easy, right? Yea, I just created a canvas and kept it hidden. This is the same size as original image, so I can draw on it and use it as a mask. It didn’t work! The canvas element is always Null! Looks like if the canvas is hidden, Toga does not even initialize it, so drawing on it is out of question.
No worries, we will use PIL. I changed canvas to an image and used PIL drawing methods to draw over the image. One good thing is that Toga ImageView can also work with PIL images, so I did not need any conversions. Eventually my drawing method looks something like this. I have the coordinates.
lold = (
  self.last_mouse_pos[0] - self.img_left_offset,
  self.last_mouse_pos[1] - self.img_top_offset
)
lnew = (
  mousex - self.img_left_offset,
  mousey - self.img_top_offset
)

draw = ImageDraw.Draw(self.img_canvas)
  draw.line([
    int(lold[0] / self.img_ratio),
    int(lold[1] / self.img_ratio),
    int(lnew[0] / self.img_ratio),
    int(lnew[1] / self.img_ratio)
  ],
  fill=mask_color,
  width=brush_size.value
)

img_2_draw = Image.composite(
  self.img_loaded,
  self.img_red_mask,
  self.img_canvas
)
self.imgarea.image = img_2_draw
Here img_red_mask is just an empty Red image same size as original so that we can create the composite.
Phew, finally I have something that works and I can draw mask.
This is not the full code, but just extracts to show the challenges I had with Toga. But then all is well that ends well. So, let’s see some results!
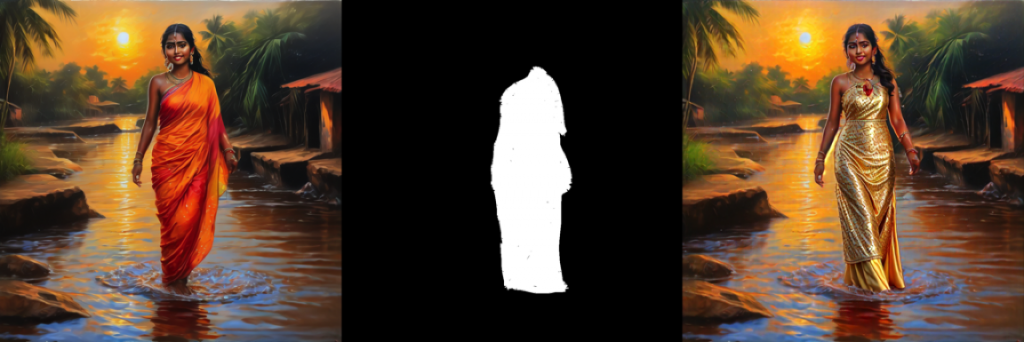
The prompt in here was “golden color frock, intricate details”.
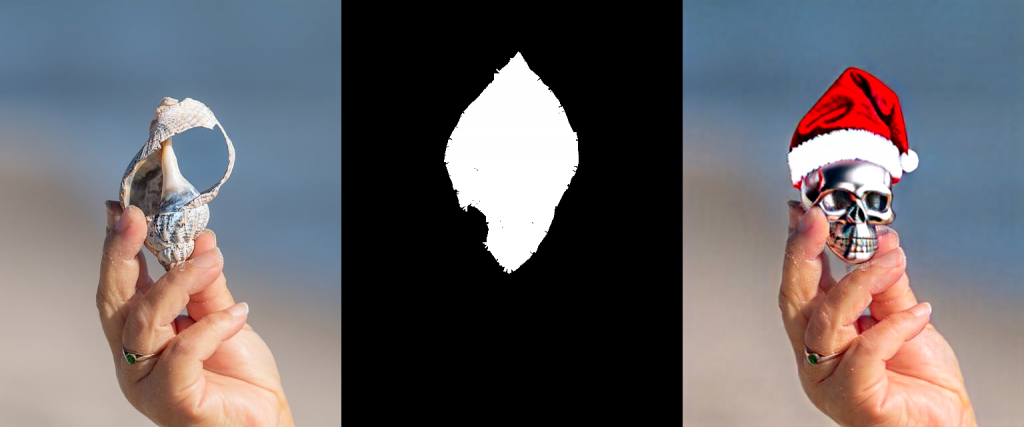
Prompt here is “silver skull wearing a santa clause hat”.
Conclusion
This was just my experience with Python Toga GUI library. For a lot of other things, I am definitely going to use this library. It’s very easy to use. However, the use case that I undertook here was probably not the best use case for this. Ciao for now!