Python has come a long way since the first image processing library called PIL. There are a lot of different libraries present today including opencv, scikit-image, scipy or numpy. But after PIL was retired, it was forked and made compatible with Python 3.0 under a separate project called Pillow. This is used extensively for image processing as it is potentially one of the easiest to learn, and the first library that comes to mind when thinking about image processing using Python.
In this blog post, let me document various highly used functions. While at it, I will also add relevant codes for future use.
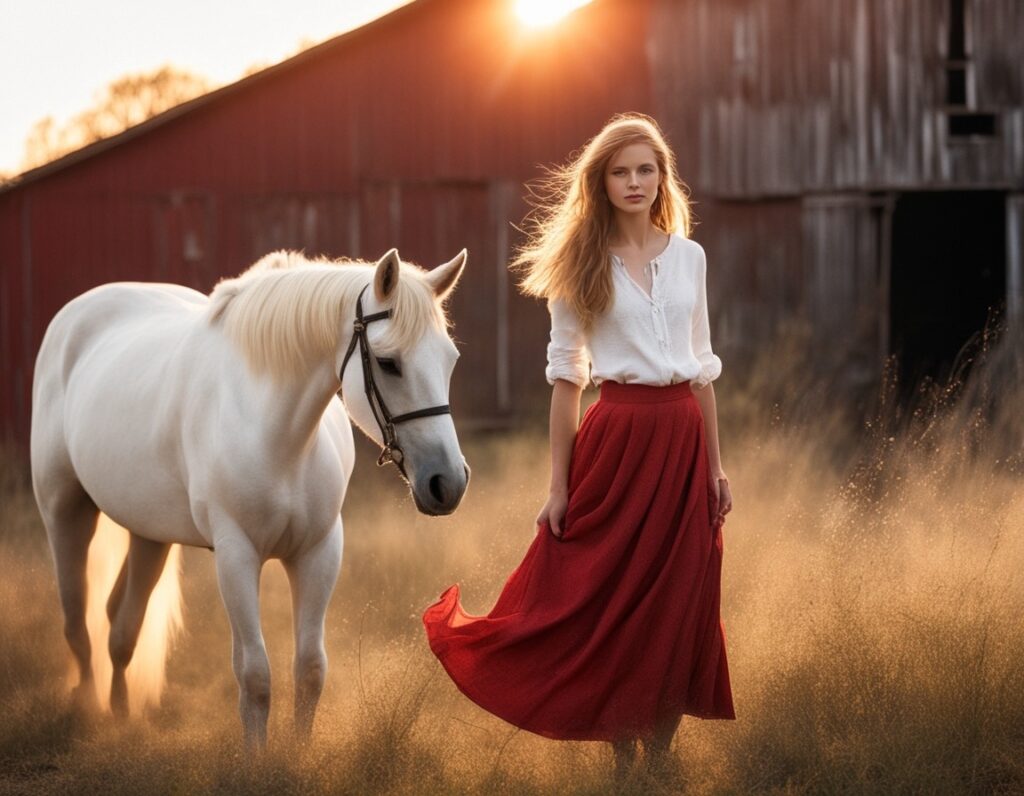
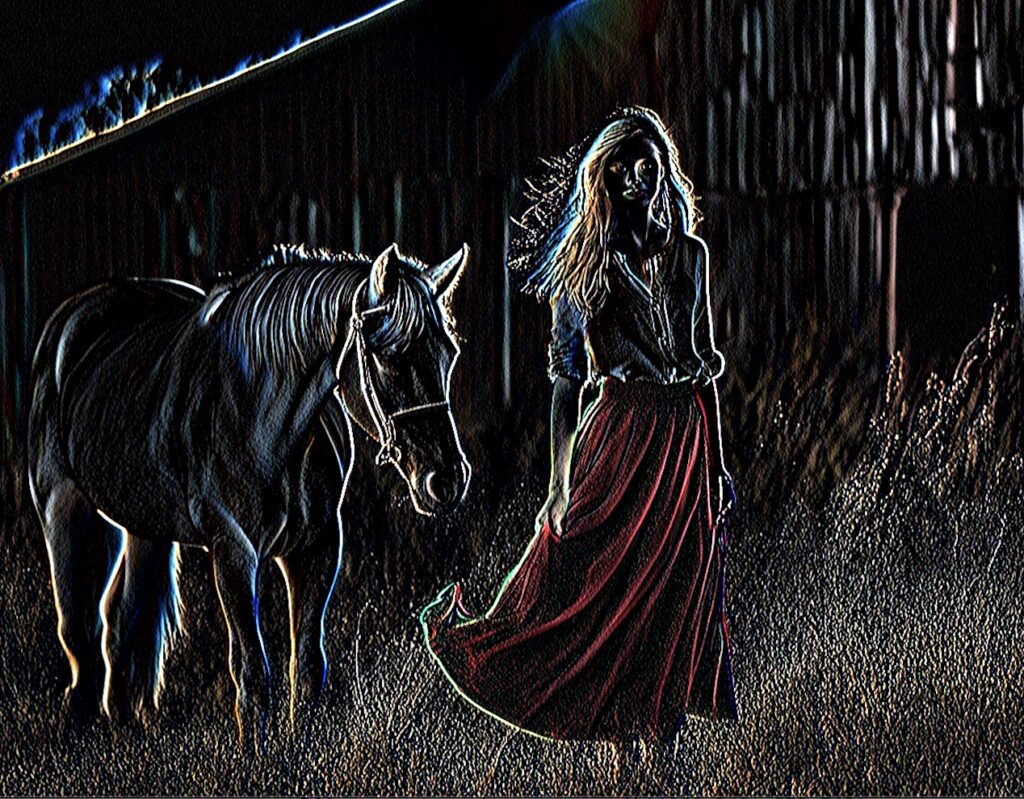
I generated an image for using with this project. It’s a girl standing with a horse in front of a barn. I do like where image generation from text has advanced now. Things look so realistic. Without further ado, here is the image that I will use.
History of Pillow
Always start with the history, even if you do not like that subject. The first imaging library in Python was PIL (Python Imaging Library). According to Wikipedia, the original version was released in 1995 and was developed by Fredrik Lundh. Development stopped in 2011 and it never supported Python 3.x. The current version of PIL (viz. Pillow) is forked from original by Jeffrey A. Clark. According to developers, this library provides extensive file format support, an efficient internal representation, and fairly powerful image processing capabilities. You can always check for capabilities by running features on the library.
That out of the way, let’s start with the features now.
Installation
I will use a virtual environment for this feature testing. I will be using PIP. Pillow is also available for Conda if that is what you want to use. I am just writing the relevant shell commands.
$ python -m venv pillow-test
$ . ./pillow-test/bin/activate
(pillow-test) pip install -U pillow
Let’s start using this library now.
Reference Applications
Time to get our hands dirty. We will create a class for our use. This is the basic structure of the class that we start with,
import numpy as np
from PIL import Image, ImageDraw, ImageFont, ImageFilter, features
from urllib.request import urlopen

class PillowTutor:
  def __init__(self) -> None:
        pass

  def compiled_features(self):
        """
        Get all compiled features for PIL
        """
        print(features.pilinfo())

if __name__ == "__main__":
  pt = PillowTutor()
  pt.compiled_features()
We have imported a lot of classes on the header. The reason we have them is that we will use them later in our reference document. I have added one function to this. It shows built in features and file format supports. You will see a list of supports first, like this,
--------------------------------------------------------------------
--- PIL CORE support ok, compiled for 10.2.0
--- TKINTER support ok, loaded 8.6
--- FREETYPE2 support ok, loaded 2.13.2
--- LITTLECMS2 support ok, loaded 2.16
--- WEBP support ok, loaded 1.3.2
--- WEBP Transparency support ok
--- WEBPMUX support ok
--- WEBP Animation support ok
--- JPEG support ok, compiled for libjpeg-turbo 3.0.1
--- OPENJPEG (JPEG2000) support ok, loaded 2.5.0
--- ZLIB (PNG/ZIP) support ok, loaded 1.3
--- LIBTIFF support ok, loaded 4.6.0
*** RAQM (Bidirectional Text) support not installed
*** LIBIMAGEQUANT (Quantization method) support not installed
--- XCB (X protocol) support ok
--------------------------------------------------------------------
This is followed by supported file formats. I am giving an example below,
--------------------------------------------------------------------
JPEG image/jpeg
Extensions: .jfif, .jpe, .jpeg, .jpg
Features: open, save
--------------------------------------------------------------------
JPEG2000 image/jp2
Extensions: .j2c, .j2k, .jp2, .jpc, .jpf, .jpx
Features: open, save
--------------------------------------------------------------------
Opening Files
The first thing that you want to do is to open a file. PIL will open any supported files (see previous section to identify supported formats).
import numpy as np
from PIL import Image, ImageDraw, ImageFont, ImageFilter, features
from urllib.request import urlopen

class PillowTutor:
  """
  OTHER CODES
  """
  def opening_image(self, imgfile):
        """
        Opening Images, different types
        """
        im1 = Image.open(imgfile)
        return im1

  def opening_images(self, imgfile, imgurl):
        """
        Opening Images, different types
        """
        im1 = Image.open(imgfile)
        im2 = Image.open(urlopen(imgurl))
        return im1, im2
I defined two methods here. One of them opens an image from file, the second one additionally opens an image from an URL as well. Just wanted to show that both these options are supported.
These are just the basic call the we will do initially to open a file.
Utility Functions
Next up, let me define some utility functions used later in the code. The first one is to concat multiple images, resize and display. This is a convenience method to show what we accomplished.
class PillowTutor:
  """
  OTHER CODES
  """

  def concat_images(self, imgs, txts, cols=0, resze=False):
        """
        We will take a list of images and concat them here for display.
        Finally we show and wait for
        """
        (w, h) = imgs[0].size
        if resze:
            for im in imgs:
                (imw, imh) = im.size
                w = imw if w > imw else w
                h = imh if h > imh else h
            for idx, im in enumerate(imgs):
                imgs[idx] = im.resize((w, h), Image.Resampling.BICUBIC)

        if cols == 0:
            cols = len(imgs)
        new_img = Image.new('RGB', (len(imgs) * w, (h + 35) * cols))
        cnt = 0
        offset = 0
        height = 0
        font = ImageFont.truetype("Arial.ttf", 16)

        for idx, im in enumerate(imgs):
            cnt += 1
            imdraw = ImageDraw.Draw(new_img)
            new_img.paste(im, (offset, height))
            imdraw.text((offset + 2, height + h + 10),
                        txts[idx], font = font, fill=(255, 255, 255))
            offset += w
            if cnt == cols:
                cnt = 0
                offset = 0
                height += h + 35
        new_img.show()
In this code, we are resizing for the smallest image so that we can accommodate all images. Finally we keep on appending images in row/ column order to display. On line #38 we display the image. We have used a PIL function here. We used .resize(). This function is used for resizing images. Let’s talk about the function next.
Resize vs. Thumbnail
PIL supports two different ways for resizing images. Resize and Thumbnail. Let’s take an example.
class PillowTutor:
  """
  OTHER CODES
  """

  def thumbnail_vs_resize(self, img):
        """
        ------- THUMBNAIL VS RESIZE -------
        Thumbnail takes the max width and height and scales the image to fit.
        It will also preserve the aspect ratio.

        Resize takes the width and height and scales to accomodate to that size.
        It will not preserve the aspect ratio.
        """
        im1 = img.copy()
        im1.thumbnail((500, 600))
        im2 = img.copy()
        im2 = im2.resize((500, 600))
        self.concat_images([im1, im2], ["Thumbnail", "Resize"], 0, False)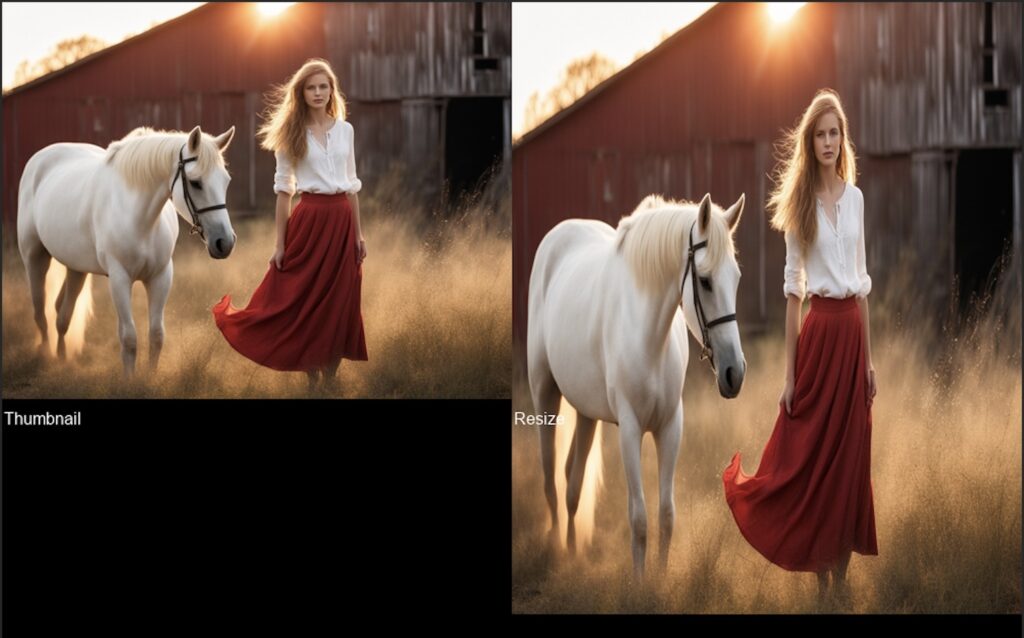
Resize will resize to the exact dimension that you have specified and ignores the aspect ration. On the other hand, Thumbnail will calculate the height or width so that none exceeds the size specified, and finally resize the image respecting the aspect ratio. Thumbnail will also not zoom the image to a size greater than the image size.
On the screenshot above, left side is the thumbnail (proper aspect ratio). The one on the right is resized and looks stretched.
Image Modes
Pillow supports opening and conversion between various formats. Quite a few of these are single 8 bit channel images. Also, we have a P mode where a 256 color palette is created and the entire image is approximated using that. This may cause a pixellated iamge, giving it the mode ‘P’. Pillow also supports various colorspaces. The different types of image format supported are defined in the code in comment. If you want to see all of them, please refer to code below.
class PillowTutor:
  """
  OTHER CODES
  """

  def image_modes(self, img):
        """
        IMAGE Type  | Description
        --------------------------------------------------------
        1           | (1-bit) Black and White, 1 bit per pixel
        L           | (8-bit) Luminance channel only, so only 1 channel
        LA          | (2x8-bit) Luminance channel and Alpha channel
        P           | (8-bit) Pixellated mode. A 256 color dictionary is used.
        RGB         | (3x8-bit) Red, Green, Blue channels
        RGBA        | (4x8-bit) Red, Green, Blue, Alpha channels
        YCbCr       | (3x8-bit) Luminance, Blue difference, Red difference.
        CMYK        | (4x8-bit) Cyan, Magenta, Yellow, Black (Key).
        LAB         | (3x8-bit) L*A*B color space.
        HSV         | (3x8-bit) Hue Saturation Value color space.
        """
        im1 = img.convert("1")
        im2 = img.convert("L")
        im3 = img.convert("P")
        im4 = img.convert("CMYK")
        im5 = img.convert("YCbCr")
        im6 = img.convert("LAB")
        im7 = img.convert("HSV")
        self.concat_images([img, im1, im2, im3, im4, im5, im6, im7],
                           ["RGB: " + img.mode, "B&W: " + im1.mode,
                            "Luminance: " + im2.mode, "Pixelated: " + im3.mode,
                            "CMYK: " + im4.mode, "YCbCr: " + im5.mode,
                            "LAB: " + im6.mode, "HSV: " + im7.mode], 4, True)
Let’s see how this comes up. Image displayed are RGB, B&W, Luminance only, Pixelated, CMYK, YCbCr, LAB and HSV in that order.
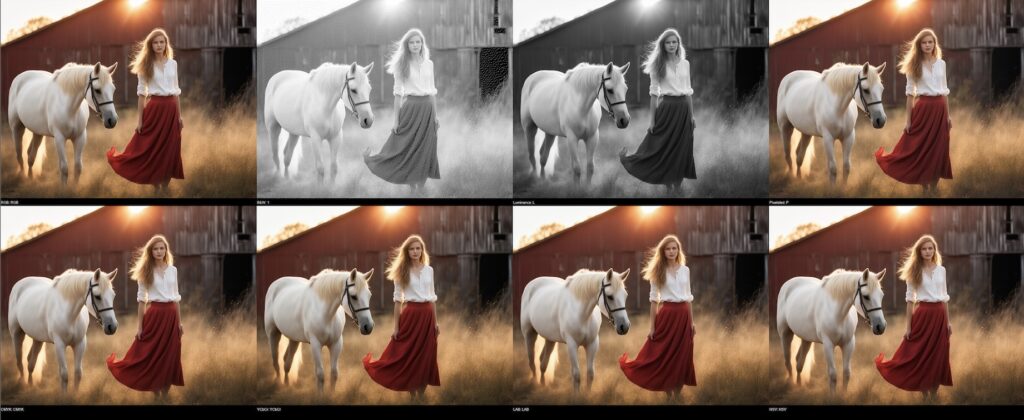
Image Filters
PIL supports a lot of different filters by default. Filters are used to enhance the photos in a specific way. I am showing the filters available below. Additionally you can also have convolution kernel for custom filters. We will talk about that at a later point in this blog. For now, filters…
class PillowTutor:
  """
  OTHER CODES
  """

  def image_filters(self, img):
        """
        ------- IMAGE FILTERS -------
        We can apply filters to images. Let's see some of them.

        FILTER              | Description
        --------------------------------------------------------
        BLUR                | Blurs the image
        DETAIL              | Enhances the details in the image
        EDGE_ENHANCE        | Enhances the edges in the image
        EDGE_ENHANCE_MORE   | Enhances the edges in the image
        EMBOSS              | Embosses the image
        FIND_EDGES          | Finds the edges in the image
        SHARPEN             | Sharpens the image
        SMOOTH              | Smooths the image
        """
        im1 = img.filter(ImageFilter.BLUR)
        im2 = img.filter(ImageFilter.DETAIL)
        im3 = img.filter(ImageFilter.EDGE_ENHANCE)
        im4 = img.filter(ImageFilter.EDGE_ENHANCE_MORE)
        im5 = img.filter(ImageFilter.EMBOSS)
        im6 = img.filter(ImageFilter.FIND_EDGES)
        im7 = img.filter(ImageFilter.SHARPEN)
        im8 = img.filter(ImageFilter.SMOOTH)
        self.concat_images([im1, im2, im3, im4, im5, im6, im7, im8],
                           ["Blur", "Detail", "Edge Enhance",
                            "Edge Enhance More", "Emboss", "Find Edges",
                            "Sharpen", "Smooth"],
                           4, True)
Let’s see the output now,
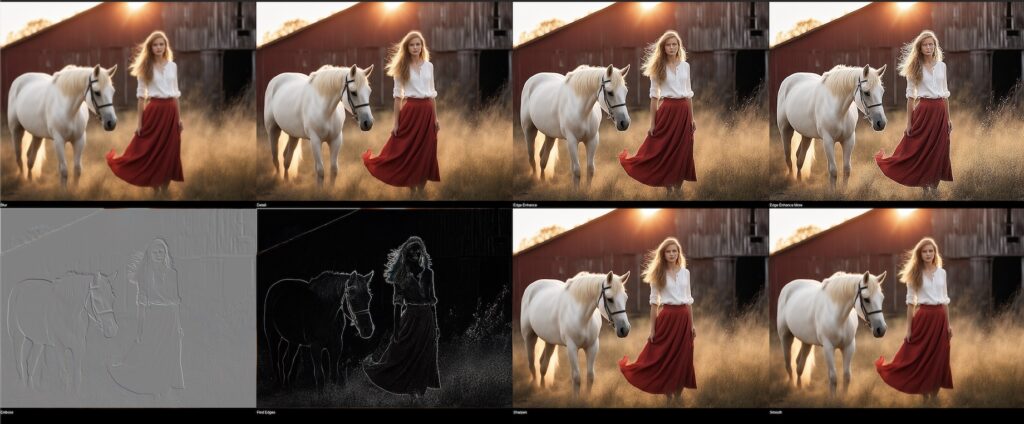
Code is documented with appropriate comments for each of them. The images above are for following, Blur, Detail, Edge Enhance, Edge Enhance More, Emboss, Find Edges, Sharpen and Smooth in that sequence.
Playing with Channels
Pillow allows us to work on and extract individual channels. For example we can extract red, green and blue channels from this image. Remember, when one channel is extracted, it becomes a 8 bit image – which looks black and white. Of course we can then create a merged image with 0s for the other channel to get an interesting effect.
The other thing we can do is switch channels. So, instead of RGB, we can switch it to BRG, BGR, BRB…. you get the point. Let’s try both of them now.
class PillowTutor:
  """
  OTHER CODES
  """

  def split_channels(self, img):
        """
        This process will split the channels of an image. Then we start playing
        with combining the channels in different orders.
        """
        r, g, b = img.split()

        # Add these back to Image, merge with zeroed Luminance channel
        (w, h) = img.size
        zeroes = Image.fromarray(np.zeros((h, w)), mode='L')
        rmerge = Image.merge("RGB", (r, zeroes, zeroes))
        gmerge = Image.merge("RGB", (zeroes, g, zeroes))
        bmerge = Image.merge("RGB", (zeroes, zeroes, b))
        self.concat_images([r, g, b, rmerge, gmerge, bmerge],
                           ["Red", "Green", "Blue", "Red",
                            "Green", "Blue"], 3, False)

        # Now switch the channels
        print("Now let's switch the channels.")
        bgr = Image.merge("RGB", (b, g, r))
        gbr = Image.merge("RGB", (g, b, r))
        rbg = Image.merge("RGB", (r, b, g))
        brg = Image.merge("RGB", (b, r, g))
        grb = Image.merge("RGB", (g, r, b))
        self.concat_images([img, bgr, gbr, rbg, brg, grb],
                           ["rgb", "bgr", "gbr", "rbg",
                            "brg", "grb"], 3, False)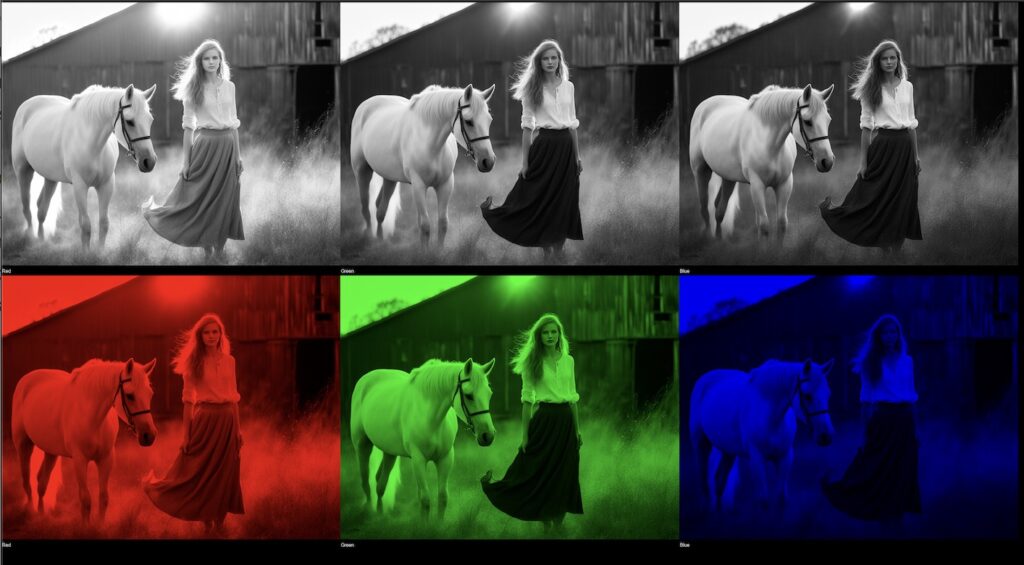
This shows the RGB channels split and then finally overlayed on a 3×8 bit RGB image. Now for switching the channels.

Here the first image is original. We have switched the channels for every other image giving them an interesting effect.
Image Transpose
Pillow also has methods to do various transpose operations. We can flip images, rotate images, transverse images etc. Let’s try it out next. Like the rest, code is commented to give more details.
class PillowTutor:
  """
  OTHER CODES
  """

  def image_transpose(self, img):
        """
        ------- IMAGE TRANSPOSE -------
        This will take a look at different transpose options.

        Transpose Operation   | Description
        --------------------------------------------------------
        TRANSPOSE             | Transpose the image
        TRANSVERSE            | Transverse the image
        ROTATE_90             | Rotate the image 90 degrees
        ROTATE_180            | Rotate the image 180 degrees
        ROTATE_270            | Rotate the image 270 degrees
        FLIP_LEFT_RIGHT       | Flip the image left to right
        FLIP_TOP_BOTTOM       | Flip the image top to bottom
        """
        im1 = img.transpose(Image.Transpose.TRANSPOSE)
        im2 = img.transpose(Image.Transpose.TRANSVERSE)
        im3 = img.transpose(Image.Transpose.ROTATE_90)
        im4 = img.transpose(Image.Transpose.ROTATE_180)
        im5 = img.transpose(Image.Transpose.ROTATE_270)
        im6 = img.transpose(Image.Transpose.FLIP_LEFT_RIGHT)
        im7 = img.transpose(Image.Transpose.FLIP_TOP_BOTTOM)
        self.concat_images([im1, im2, im3, im4, im5, im6, im7],
                           ["Transpose", "Transverse", "Rotate 90",
                            "Rotate 180", "Rotate 270", "Flip Left Right",
                            "Flip Top Bottom"], 4, True)
In the code above, we have applied various transpose operations to the image and the result will be as given below.
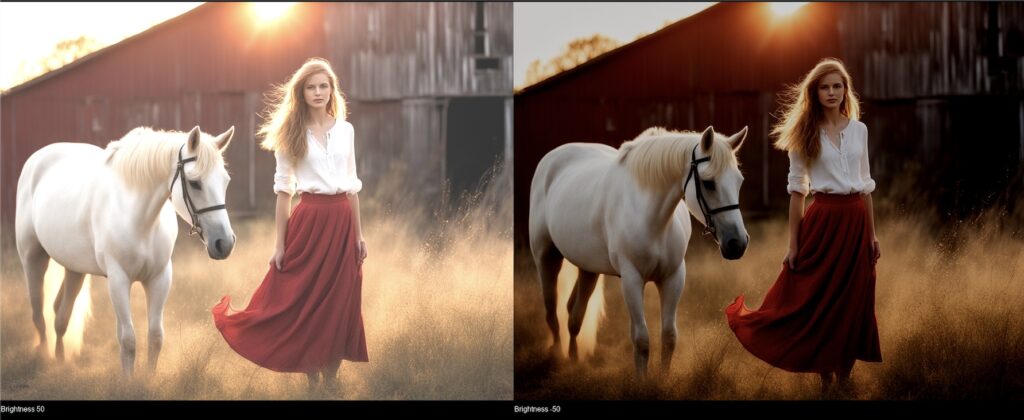
Image Brightness and Contrast Adjustment
Pillow being an imaging library, it should have brightness and contrast adjustments. And lo and behold, it does have it. These are basic operations, but documenting it anyway.
class PillowTutor:
  """
  OTHER CODES
  """

  def image_contrast(self, img):
        """
        ------- IMAGE CONTRAST -------
        """
        im1 = img.point(lambda x: x * 1.5)
        im2 = img.point(lambda x: x * 0.5)
        self.concat_images([im1, im2], ["Contrast 1.5", "Contrast 0.5"],
                           0, False)

  def image_brightness(self, img):
        """
        ------- IMAGE BRIGHTNESS -------
        """
        im1 = img.point(lambda x: x + 50)
        im2 = img.point(lambda x: x - 50)
        self.concat_images([im1, im2], ["Brightness 50",
                                        "Brightness -50"], 0, False)
We will just do a positive and negative operation on both of these.
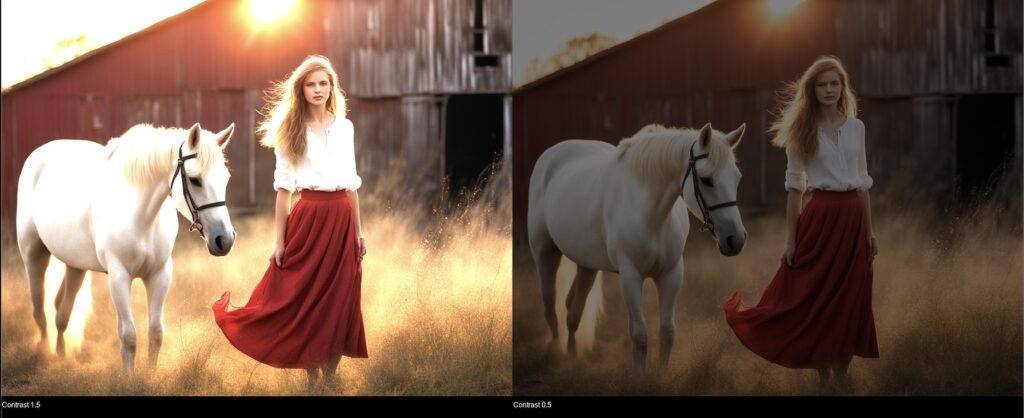
In this image set, on the original image, we have done a contrast increase by 1.5 and then a contrast decrease by 0.50. For the next image, we will do a brightness adjustment.
Convolution Kernel
What is a convolution kernel? A kernel, or a filter, is a matrix that can be combined with the image to enhance a specific feature of the image. Let’s see how it works.
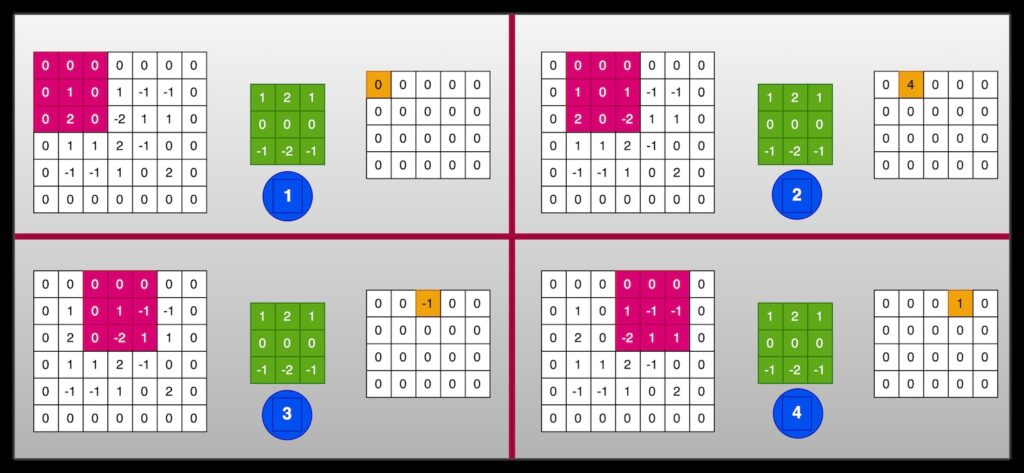
We started with the first four operations of a sliding window technique. Here the bigger matrix is an image. The box in green is the filter we are applying. Pink is the sliding window and for each of them, on the right is the output with currently calculated value highlighted in orange.
So, for each matrix, we get the sum of the dot product of the matrices and finally created a separate matrix of the same size as original. To maintain the same size, we had initially zero padded the matrix on all sides.
As you can see we start with the leftmost segment, and then keep on sliding one pixel at a time. This is how we fill up the resulting output. When we perform this operation on an RGB image, normal convention is to break it up in its individual channels and applying this filter on each of them. Finally we merge them again to get a final image.
We will now try to implement this with numpy and PIL.
from numpy.lib.stride_tricks import sliding_window_view

class PillowTutor:
  """
  OTHER CODES
  """

  def convolve_channel(self, chnl, kernel):
        """
        This will take a channel and return the result
        after running the convolution process on it.
        """
        fnl_arr = []
        # Pad 0s on all sides. This keeps size consistent.
        padded = np.pad(chnl, pad_width=1, mode='constant')
        # Create a sliding window view
        vwslide = sliding_window_view(padded, kernel.shape)
        # Convolve the kernel with the sliding window view
        for vo in vwslide:
            for vi in vo:
                val = np.sum(np.dot(vi, kernel))
                if val > 255: val = 255
                if val < 0:   val = 0
                fnl_arr.append(val)
        fnl_arr = np.reshape(fnl_arr, chnl.shape)
        return fnl_arr

  def draw_convolution_kernel(self, img, kernel):
        """
        This will split images, process every channel and
        finally merge them into a single image.
        """
        r, g, b = img.split()
        nr = np.array(r)
        ng = np.array(g)
        nb = np.array(b)
        nr_conv = self.convolve_channel(nr, kernel)
        ng_conv = self.convolve_channel(ng, kernel)
        nb_conv = self.convolve_channel(nb, kernel)
        rgb = np.dstack((nr_conv, ng_conv, nb_conv)).astype(np.uint8)
        Image.fromarray(rgb).show()
These methods have quite a bit going on. Here we are using the numpy built in method called sliding_window_view. This will create all the child matrices. Finally we do the sum of the dot product for the matrices and put in an array. We merge them to form the final image. Does it work? Let’s try the Sobel edge detection filter (on a color image). Kernel for sobel is defined as follows,
[
    [1, 2, 1],
    [0, 0, 0],
    [-1, -2, -1]
]
Let’s see how this filter looks like, passed through our code.
The PIL way for processing Convolution Kernels
Of course what we did in last section is overkill. I am sure you guessed it. There must be something in PIL for that. We can use filter method on the image and pass in a numpy matrix. Let’s see that in action.
class PillowTutor:
"""
OTHER CODES
"""
def convolve_kernel(self, img):
"""
Convolution Kernels. Try some samples.
"""
kernel = np.array([[-1, -1, -1], [-1, 9, -1], [-1, -1, -1]])
im1 = img.filter(ImageFilter.Kernel((3, 3), kernel.flatten(), 1, 0))
kernel = np.array([[1, 2, 1], [0, 0, 0], [-1, -2, -1]])
im2 = img.filter(ImageFilter.Kernel((3, 3), kernel.flatten(), 1, 0))
kernel = np.array([[1/9,1/9,1/9],[1/9,1/9,1/9],[1/9,1/9,1/9]])
im3 = img.filter(ImageFilter.Kernel((3, 3), kernel.flatten(), 1, 0))
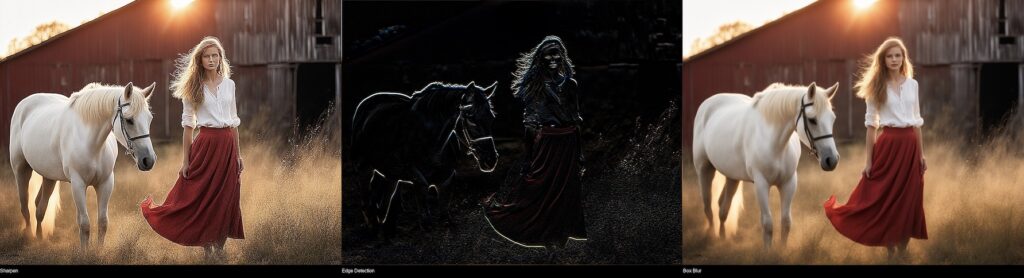
self.concat_images([im1, im2, im3], ["Sharpen", "Edge Detection",
"Box Blur"], 0, False)Here are the three image effects that we got.
Random Kernels
We can play with these filters by generating random one. Most of the times you will probably not get something useful, but who knows, you may end up with something you like.
class PillowTutor:
  """
  OTHER CODES
  """

  def random_kernel(self, img):
        """
        Image Ref: 10
        Generate some random kernels. Was any of them good?
        """
        kernel1 = np.random.randint(-1, 2, (3, 3))
        im1 = img.filter(ImageFilter.Kernel((3, 3), kernel1.flatten(), 1, 0))
        kernel2 = np.random.randint(-1, 2, (3, 3))
        im2 = img.filter(ImageFilter.Kernel((3, 3), kernel2.flatten(), 1, 0))
        kernel3 = np.random.randint(-1, 2, (3, 3))
        im3 = img.filter(ImageFilter.Kernel((3, 3), kernel3.flatten(), 1, 0))
        self.concat_images([img, im1, im2, im3],
                           ["Original", "Convolved: {}".format(np.array(kernel1).flatten()),
                            "Convolved: {}".format(np.array(kernel2).flatten()),
                            "Convolved: {}".format(np.array(kernel3).flatten())], 2, False)
Here is a sample I got.

The kernel arrays for the three images on top are,
[[1, 1, 1], [-1, 0, 1], [1, 1, 1]]
[[0, -1, 0], [0, -1, 1], [1, 1, -1]]
[[0, -1, 1], [-1, 1, 1], [0, 1, -1]]
Creating a Custom Mask
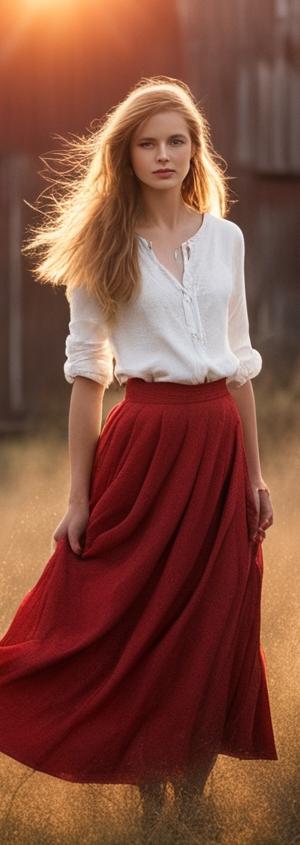
Let’s create a full featured project now. We will use the cropped image of the girl for this project. This will be crude, but will give the idea of power of Pillow. We will select the girls skirt, replace with a different color.
During this exercise, we will also use erode and dilate commands of pillow. These are also very useful commands.
We start be selecting a mask based on the color of the skirt. Like I said, this is crude, so, we will just select within a range of colors.
To start, we will define couple of methods that can erode or dilate an image continuously for the specified number of times. You may ask, what is dilation and erosion? Let’s start with erosion. Erosion is a morphological operation that removes any outlying pixels in the image. Eventually it helps in smoothing the image by removing redundancies. Dilation on the other hand, fills in holes and boundaries that look like outliers. Eventually it increases the size of the image.
That out of the way, let’s code,
class PillowTutor:
  """
  OTHER CODES
  """

  def split_img_vert(self, img, prcnt):
        """
        This is an utility function that is created to support a function later.
        It takes two parameters and splits the image into two vertical parts.
        """
        im1 = img.crop((0, 0, img.width, img.height // prcnt))
        im2 = img.crop((0, img.height // prcnt, img.width, img.height))
        return im1, im2

  def join_img_vert(self, im1, im2):
        """
        This is a companion utility function to merge images split by the
        function above.
        """
        img = Image.new('L', (im1.width, im1.height + im2.height))
        img.paste(im1, (0, 0))
        img.paste(im2, (0, im1.height))
        return img

  def erode_image(self, times, img):
        """
        This is an utility function that will be used later for eroding
        a mask.
        """
        for x in range(times):
            img = img.filter(ImageFilter.MinFilter(3)) # 3x3 Min Filter
        return img

  def dilate_image(self, times, img):
        """
        This is an utility function that will be used later for dilating
        a mask.
        """
        for x in range(times):
            img = img.filter(ImageFilter.MaxFilter(3)) # 3x3 Max Filter
        return img
Okay, now we know how to erode and dilate. Let’s see the main code that will extract the skirt and color it. We have found that the skirt color is between the following colors approximately. There are couple more functions as well that are used later.
from_color = (0x00, 0x00, 0x00)
to_color = (0xCA, 0x1C, 0x25)
With that in mind, here is the next set of code.
class PillowTutor:
  """
  OTHER CODES
  """

  def create_color_mask(self, img):
        """
        Image Ref: 8
        This does quite a few things. It extracts the girl image and then
        creates a mask between color values. To remove unnecessary mask
        selections, we run erode and dilation to smooth out the mask.
        """
        # Extract the girl from image for processing
        crop_img = img.crop((550, 50, 850, 895))
        crop_img.save("../sample/girl.jpg")

        # Define color range
        from_color = (0x00, 0x00, 0x00)
        to_color = (0xCA, 0x1C, 0x25)
        pixels = crop_img.getdata()

        # Mask between the color range
        new_pixels = []
        for pixel in pixels:
            if pixel[0] > from_color[0] and pixel[0] < to_color[0] and \
                pixel[1] > from_color[1] and pixel[1] < to_color[1] and \
                pixel[2] > from_color[2] and pixel[2] < to_color[2]:
                new_pixels.append(1)
            else:
                new_pixels.append(0)

        mask = Image.new("1", crop_img.size)
        mask.putdata(new_pixels)

        # Smooth out the mask
        im_top, im_bot = self.split_img_vert(mask, 3)
        ero_mask = self.erode_image(3, im_top)
        upd_mask = self.join_img_vert(ero_mask, im_bot)
        dil_mask = self.dilate_image(3, upd_mask)

        # Just a blank red image and then add to the cropped image
        red_img = Image.new(mode="RGB", size=crop_img.size, color =
                            (0xCE, 0x20, 0x29))
        cmp_img = Image.composite(red_img, crop_img, dil_mask)
        self.concat_images([crop_img, mask, upd_mask, dil_mask, red_img,
                            cmp_img], ["Cropped Image", "Mask",
                                       "Updated Mask", "Dilated Mask",
                                       "Red Image", "Composite Image"],
                           0, False)
Between line #23 and #30, we are extracting just the pixels of interest and storing them. This is the mask. Finally, line #37, we erode, followed by dilation on line #39.
Finally, we create a blank red image and overlay original on top with the mask as reference.
The output looks as follows.
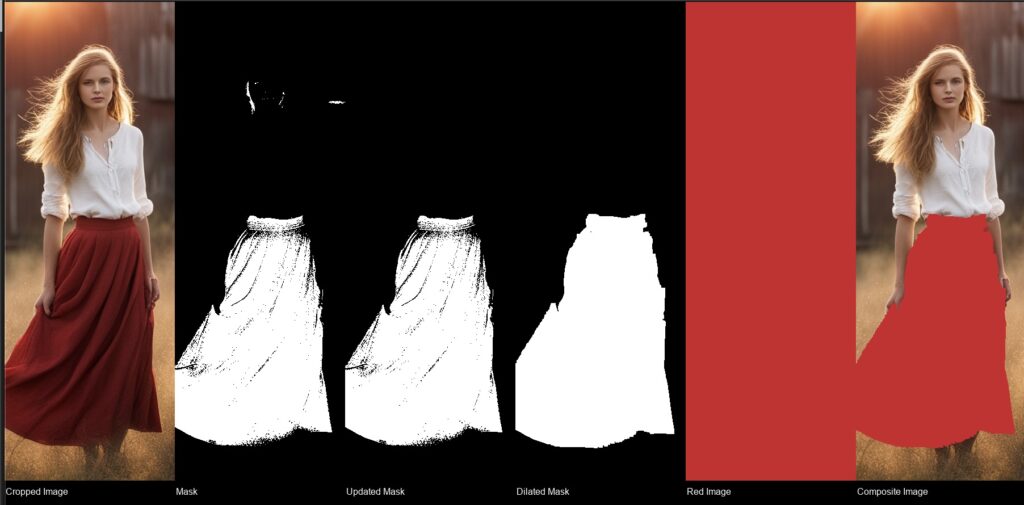
Starting with the image, we have extracted just the skirt. We also got some other areas that we do not want. So, we remove the top third. There are still some areas that we can fill. We run a dilate to fill these areas. That’s it. Our final mask! Now what is left is to add the girl.
Conclusion
That’s it! Quite a few operation defined here. I just wanted to have some of these functions documents for my future reference. Hope you find it interesting as well. Ciao for now!