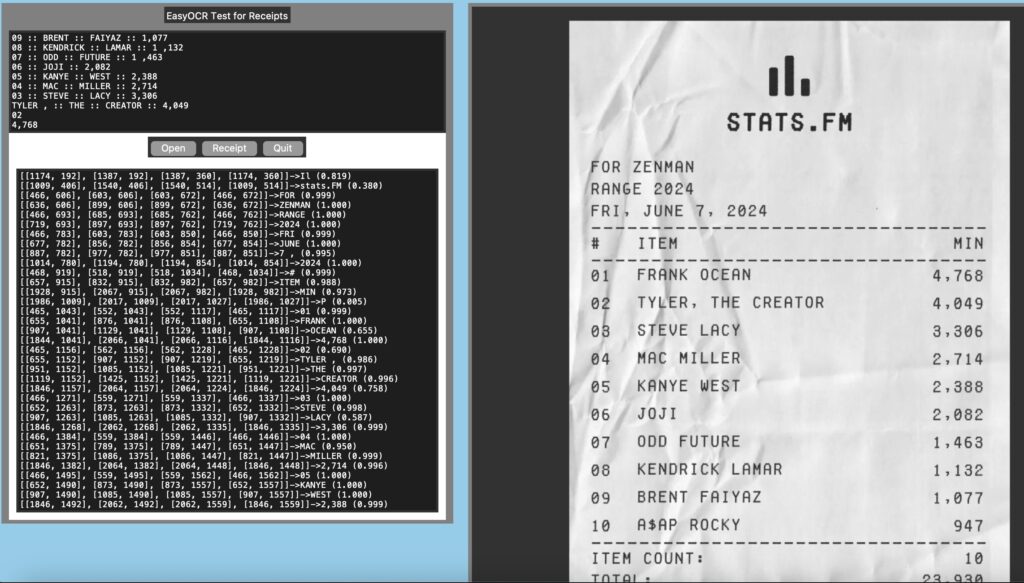
Recently I was looking for some OCR programs to process some receipts. Eventually I may just be using Azure of AWS to process them, but before that I thought why not get some free to use tools and see how they work. I downloaded the receipt in the image above from the net and using it just for testing my program.
We all know Tesseract. It is the first free to use tool that comes to mind when we think OCR. I have already used this, so I started looking for alternatives. I found EasyOCR that seemed to be using ResNet and LSTM pipeline for extracting text. EasyOCR is a program for Python developers and supports 80+ languages. It supports GPU processing, so on a computer having supported GPU, it runs nice and fast.
The Problem
The client here is getting a lot of different invoices and receipts from different vendors for services rendered by them. Of course all of these are in different sizes and shapes. Some are nice and printed, while others are hand-written. Invoices are different even for the same vendor. Client takes all of these different invoices and manually enters the dollar values in an application built by us for further processing. We wanted to see what we can do to reduce this pain. One option we were thinking is processing at least some of these invoices automagically to corresponding fields. This will increase accuracy and also will speed up the entry process.
One problem is that most of these documents are PDF. But EasyOCR cannot read PDF. So, the first thing is to convert the PDFs (Portable Document Format) to PNGs (Portable Network Graphics). For this I used PyMuPDF library. I will provide that also as an example.
Converting PDF
We will use PyMuPDF==1.24.3 for the conversion. Why did I select this library? No specific reason, just the first one I can grab. This was only needed for the workflow.
def pdf2png(self, flin):
  doc = fitz.open(flin)
  zoom_x = 300 / 72   # 300 DPI
  zoom_y = 300 / 72   # 300 DPI
  for pg in range(doc.page_count):
    page = doc[pg]
    mat = fitz.Matrix(zoom_x, zoom_y)
    pix = page.get_pixmap(matrix=mat, alpha=True)
    out_file = self.outfilepath
    pix.pil_save(out_file, optimize=True, dpi=(300, 300))
    doc.close(
    return out_file
Here we convert the PDF file. We know all of these PDF files have one single page (as that is what we use for testing). We will convert the pages to 300 dpi. This helps us create a better resolution image. Note that this intermediate file does not need to be saved and can be used in the pipeline as a numpy array. The only reason I am saving this is because I also wanted to see how the files are being converted so that I can get a better idea of the OCR process.
Now that I have the image file in place, next step is to create a OCR pipeline. For testing this I created a simple tk based program that can open a file, display the generated image and runs it through the OCR tool. There are three different OCR interactions in the tool for my convenience.
- All text identifications are listed in a text area for reference
- Clicking on any part of the image displays the text identified under the cursor
- Can run a line by line receipt like scanning on a selected area of image
Layout
From the perspective of this blog, creating the layout is not important and will not be discussed. I am just adding the code below to create this UI.
def drawgui(self):
  # Create Frame widget
  left_frame = Frame(self.root, width=350, height=800, bg='grey')
  left_frame.grid(row=0, column=0, padx=10, pady=5, sticky='n')

  right_frame = Frame(self.root, width=950, height=800, bg='grey')
  right_frame.grid(row=0, column=1, padx=10, pady=5)

  # Create label above the tool_bar
  Label(left_frame, text="EasyOCR Test for Receipts").grid(row=1, column=0, padx=5, pady=5)

  # Display image in right_framed
  # load image to be
  temp_image = PhotoImage(file=self.scanfilepath)
  image = temp_image.subsample(self.reduce, self.reduce) # Resize

  self.right_label = Label(right_frame, image=image)
  self.right_label.grid(row=0,column=0, padx=5, pady=5)

  self.right_label.configure(image=image)
  self.right_label.image = image
  # General Click Handler
  self.right_label.bind("<Button>", self.clickhandler)
  # Start of drag for area selection
  self.right_label.bind("<ButtonPress-1>", self.presshandler)
  # Finish drag
  self.right_label.bind("<ButtonRelease-1>", self.releasehandler)

  # Left panel stuff
  tool_frame = Frame(left_frame, width=200, height=800, bg='white')
  tool_frame.grid(row=2, column=0, padx=10, pady=5, sticky='e')
  self.text = Text(tool_frame, height=10)
  self.text.grid(row=0, column=0, sticky='nsew')

  # Button panel
  btn_frame = Frame(tool_frame, width=100, height=50, bg='grey')
  open_btn = Button(btn_frame, text="Open", command=self.openfile)
  line_btn = Button(btn_frame, text="Receipt", command=self.receiptparse)
  quit_btn = Button(btn_frame, text="Quit", command=self.root.destroy)
  open_btn.grid(row=0, column=0)
  line_btn.grid(row=0, column=1)
  quit_btn.grid(row=0, column=2)
  btn_frame.grid(row=2, column=0, padx=10, pady=5)

  # All scans
  self.text_scan = Text(tool_frame, height=35)
  self.text_scan.grid(row=3, column=0, padx=10, pady=10, sticky='nsew')
OCR using EasyOCR
EasyOCR is written on top of PyTorch. It uses a three step process to parse the texts. The first step is feature extraction. This is where it uses a trained ResNet (Residual Network, a deep learning model) models that will try to identify text from the images. The next step is to use a LSTM (Long Short Term Memory) based model to verify the context of the extracted text. Final step is decoding. This step labels all the found text and completes the process.
EasyOCR uses a pluggable architecture so any of these steps can be replaced easily with a different framework if needed. That out of the way, let’s see the implementation next.
def ocrfile(self, file):
  # This line does OCR magic
  result = self.reader.readtext(file)
  self.text.delete("1.0", "end")
  self.text_scan.delete("1.0", "end")
  for x in result:
    self.text_scan.insert("end", str(x[0]) + "->" + x[1] + " (" + "{:.3f}".format(x[2]) + ")" + "\n")

    print("OCR complete...")
    return result

def openfile(self):
  filetypes = (
    ('PDF', '*.pdf'),
    ('All files', '*.*')
  )
  f = fd.askopenfile(filetypes=filetypes)
  if f:
    out = self.pdf2png(f)
    self.scanfilepath = out
    temp_image = PhotoImage(file=out)
    image = temp_image.subsample(self.reduce, self.reduce) # Resize
    self.right_label.configure(image=image)
    self.right_label.image = image
    self.coords = self.ocrfile(out)
Consider the two methods above. Openfile only opens the file dialog and you can select a receipt to scan. Apart from that it sets up quite a few class globals that can be ignored in this context. The first thing it does is to convert this file to corresponding PNG image. This image is further displayed on the right panel for viewing.
Finally we do the OCR on this image. This can be done by just calling one single method from EasyOCR viz. readtext. This method takes either a file name or can also take a numpy array as input. Like I said before, since I wanted to see the intermediate file, I am generating it, else we could have just sent the numpy object directly.
After OCR is complete, we dump this entire resultset in one of the text area for viewing.
([[245, 111], [841, 111], [841, 222], [245, 222]], 'Walmart', 0.9999766604501339)
([[257, 217], [844, 217], [844, 269], [257, 269]], 'save money-Llve better .', 0.35183567337900534)
([[286, 399], [608, 399], [608, 455], [286, 455]], '970-723-1838', 0.4819122429931272)
([[643, 398], [993, 398], [993, 458], [643, 458]], 'Mgr  JIM JAMES', 0.7046765692427707)
([[367, 460], [917, 460], [917, 521], [367, 521]], '1155 $ CAMINO DEL RIO', 0.871681866758718)
([[411, 522], [630, 522], [630, 588], [411, 588]], 'DURANGO,', 0.9614665657216883)
([[644, 526], [865, 526], [865, 582], [644, 582]], 'CQ 31303', 0.9169705175779214)
I have added a sample response from a Walmart receipt that I downloaded. It is a three part response for each element in the list. The first item is the bounding box. This box is presented as an array of coordinates such that ([Top Left XY], [Top Right XY], [Bottom Right XY], [Bottom Left XY]). The next element is the extracted text. The last one is confidence value for the detection.
I have seen major problems detecting $ (dollar) symbol. It is identified as 3, 4, 8 and sometimes S. So, it will be a major headache if any invoice has that symbol.
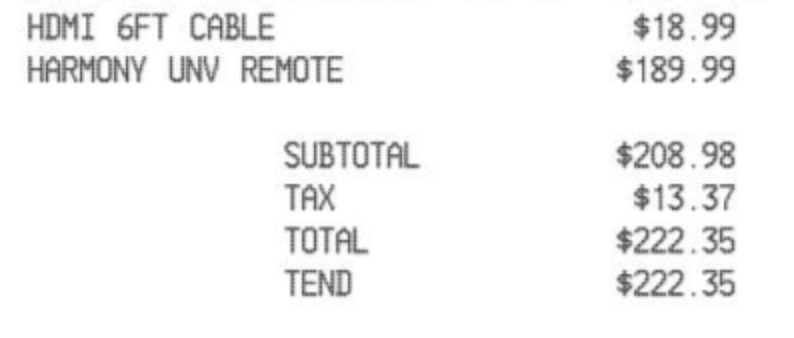
TOTAL :: 4222,35
TaX :: 413.37
SUBTOTAL :: 8203,93
HARHONY :: UNV :: REMOTE :: 8189.99
HDMI :: 6FT CABLE :: 418,99
Let’s see the image on top. Here all the dollar values are messed up. This will make this unusable for my requirement as a lot of my invoices do contain that symbol.
Just for completion, I will add one more method that I had to implement to dump text under the cursor. It just tries to identify the rectangle that contains the point and finally dumps the text contained in it.
"""
  p1...................p2
  .                    .
  p4...................p3

  So, if a point has to be here, it should be p1.x < p.x < p2x and p1.y < p.y < p4.y
"""
def findtextunderpoint(self, allpoints, selpoint):
  for apoint in allpoints:
    p1, p2, p3, p4 = apoint[0]
    if (selpoint[0] > p1[0] and selpoint[0] < p2[0] and
        selpoint[1] > p1[1] and selpoint[1] < p4[1]):
      self.text.insert("1.0", apoint[1] + "\n")
Conclusion
Even though I figured that EasyOCR will not cut for my needs, but overall as a tool it is pretty nifty and can be used in a lot of other use cases. Also, the convenience of this tool to process more than 80 languages adds an extra layer of cream on the pie. So, if you need an OCR tool, EasyOCR can be definitely considered as an alternative. Ciao for now!