I planned to add text to speech reader for help documents for one of my projects. To understand how the new HTML5 API works, I built a test application that I can leverage when I build the main application. It can display all voices that are currently available on the system and can play any text in the selected voice.
In this blog, I will document all the APIs that I had tried out for the test.
Overview of API
Let me shamelessly copy what MDN has to say about this API.
The SpeechSynthesis interface of the Web Speech API is the controller interface for the speech service; this can be used to retrieve information about the synthesis voices available on the device, start and pause speech, and other commands besides.
In layman’s term it means that this API provides with text to speech part of the Web Speech API. Currently it is supported by all major browsers.
The other component that Web Speech API has is the speech recognition part. We will not cover that interface in this blog. For curious readers you can go here and learn more about SpeechRecognition API.
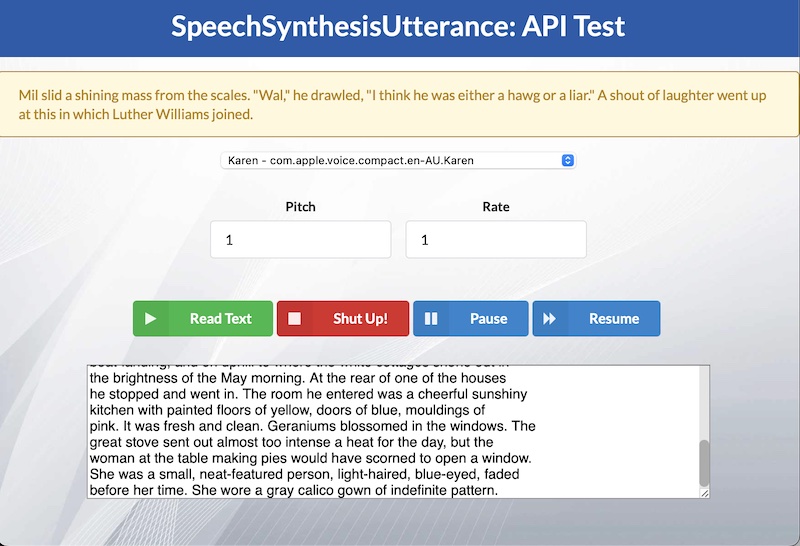
User Interface
I used semantic UI to build a basic screen, so it looks a bit organized, but eventually it only has a select list for voices, a large text area for typing in what to read and buttons to control playing the audio.
Just for completion, I will add the HTML code that I will used to create the page. The top section is created with a masthead component as below.
<div class='ui inverted vertical masthead center aligned segment'>
  <div class='ui text container'>
    <h1 class='ui inverted header'>SpeechSynthesisUtterance: API Test</h1>
  </div>
</div>
Next section is a message. We create that using the following.
<div class="ui message yellow">
  <label id="messages"></label>
</div>
Now comes the main body of the page. We have the following code generating it.
<div class="ui grid container">
  <div class="centered row">
    <select id="selvoices"></select>
  </div>

  <div class="centered row">
    <form class="ui form">
      <div class="two fields">
        <div class="field">
          <label for="txtpitch">Pitch</label>
          <input type="text" value="1" id="txtpitch" />
        </div>
        <div class="field">
          <label for="txtrate">Rate</label>
          <input type="text" value="1" id="txtrate" />
        </div>
      </div>
    </form>
  </div>

  <div class="centered row">
    <button id="btnread" class="ui button labeled icon green">
      <i class="play icon"></i>
      Read Text
    </button>
    <button id="btnstop" class="ui button labeled icon red">
      <i class="stop icon"></i>
      Shut Up!
    </button>
    <button id="btnpause" class="ui button labeled icon blue">
      <i class="pause icon"></i>
      Pause
    </button>
    <button id="btnresume" class="ui button labeled icon blue">
      <i class="forward icon"></i>
      Resume
    </button>
  </div>

  <div class="centered row">
    <div class="field">
      <textarea id="texthear" rows="8" cols="100">I find television...</textarea>
    </div>
  </div>
</div>
Supporting Code
Now that we have the UI code defined, I will start with the supporting JavaScript code. We are also using jQuery library for convenience. We will start by defining some global variables.
const speech = window.speechSynthesis;

const selVoices = $('#selvoices');
const readText = $('#texthear');
const mesgText = $('#messages');
const txtPitch = $('#txtpitch');
const txtRate = $('#txtrate');
const btnRead = $('#btnread')[0];
const btnStop = $('#btnstop')[0];
const btnPause = $('#btnpause')[0];
const btnResume = $('#btnresume')[0];

let voices = [];
On line# 1, we have got an instance of Speech Synthesis API. Following that, we have created variables for each UI component we will reference in code.
Let’s talk about how to get all the voices in the system. Speech interface provides us with a function to get all system voices. Please remember that the voices are entirely dependent on the operating system. For me, running the code on MacOS, returns me a lot of different voices for en-* language selection. However, running the same code on Windows only returns a few names.
getVoices = function() {
  selVoices.empty();
  voices = speech.getVoices();
  voices.forEach(function(x) {
    if (x.lang.startsWith('en-')) {
      selVoices.append($('<option>', {
        value: x.voiceURI,
        text: (x.name + ' - ' + x.voiceURI)
      }));
    }
  });
  showNotice('Voices loaded...');
}
We load all voices in our global array on line# 3. Then we iterate over this array and add the en-* language voices to our Select list.
Main Flow
Now let’s talk about the main functions used to drive the buttons defined in UI.
funReadText = function() {
  if (speech.speaking) {
    showNotice('Already reading....');
    return;
  }
  let txt = readText.val();
  const reader = new SpeechSynthesisUtterance(txt);

  reader.onstart = function(evnt) {
    showNotice('');
  }

  reader.onend = function(evnt) {
    showNotice('Done reading...');
  }

  reader.onpause = function(evnt) {
    showNotice('Pause reading...');
  }

  reader.onresume = function(evnt) {
    showNotice('Resume reading...');
  }

  reader.onerror = function(evnt) {
    showNotice('Read error: ' + evnt.error);
  }

  reader.onboundary = function(evnt) {
    const idx = evnt.charIndex;
    addNotice(getWordAtIndex(idx, txt));
  }

  let thisVoice = '';
  voices.forEach(function(x) {
    if (x.voiceURI == selVoices.val()) {
      thisVoice = x;
    }
  });
  reader.voice = thisVoice;
  reader.pitch = parseFloat(txtPitch.val());
  reader.rate = parseFloat(txtRate.val());
  speech.speak(reader);
}

funStopText = function() {
  if (speech.speaking) {
    speech.cancel();
  }
}

funPauseText = function() {
  if (speech.speaking) {
    speech.pause();
  }
}

funResumeText = function() {
  if (speech.paused) {
    speech.resume();
  }
}
We are defining four different functions on top. Function on line# 1 is for reading a text. We have the function for stopping read starting line# 46. Pause and resume routine are starting line #52 and line# 58 respectively.
Let’s talk about the text to speech converter routine. It defines a lot of event handlers first. When we start read, the onstart event defined on line# 9 triggers. Here we are just clearing the message box we are showing so we can show the word being read. Start, end, pause and resume are very self evident, however, onboundary on line# 29 maybe not. Every time a word is read, browser triggers this event. It returns the current count of character being read. We extract out the word from this number and add it to the message displayed.
Conclusion
Like I said before, all major browsers in use today support this API. However, the voices that are available depends on the operating system being run on. I created this test project to try out the API. Hope you find this useful. Ciao for now!