
One more year is nearly out the door. This last month of the year, I planned to write a blog for my team to help them in a early next year requirement. We will have need to enrich data coming from a web service for couple of fields. I will be using RestTemplate and not RestClient introduced in Spring Framework 6.1 M2. The reason for this is very simple. We have not officially migrated to that version yet. In future I will possibly migrate this blog to use the latest REST client recommendation.
Let’s first discuss the goal of this project. We will build a simple REST service that will expose two endpoints. This is irrelevant to what we want to discuss, but will be used on the client side to demonstrate the use of enriching response from Spring. Let’s document our flow.
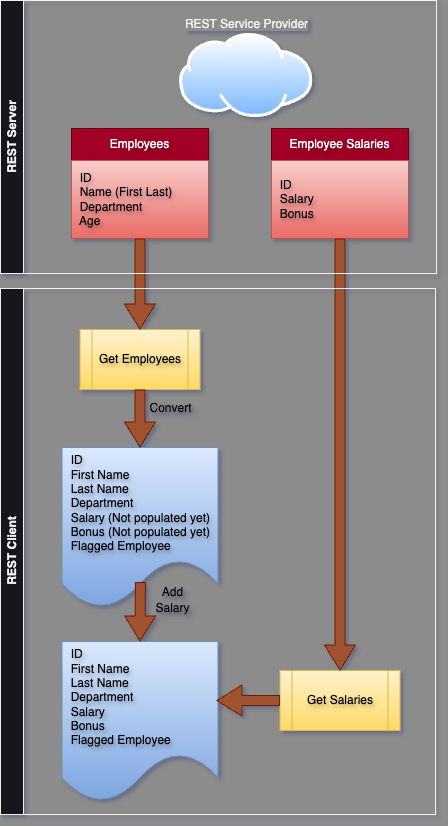
We define a very simple flow. Our server is created to provide two services. On returns all the employees, and the second can be used to fetch the salaries for employees. Assume because of design flaws this did not separate out Employee Name in First and Last components. On the client side, we will merge both these data by calling corresponding service and also enrich the data by breaking employee name in first and last parts. We also have a field called flagged that will be set to true when bonus component is higher than standard bonus component. All of these are just mock scenarios :).
Let’s start by building the server part. Since server is not the key here, we will spend very little time on it.
Server Code
I had initially thought of adding the full server code here as well, as it has some small intricacies to it, but finally decided against it. It would make the blog two big to read, and will eventually deviate from the main idea that I wanted to put in. In lieu of the server code, I am going to just add the response structure that this service returns.
As defined above, there are two REST calls this supports. For the test I have created random ID values starting at 1000 and ending at 9999. So, we have 8999 records in all created in memory. This is sufficient for the test that we want to showcase.
The beans defined below are given for your reference.
// CLASS 1 - Employee Basic Information
@Data
public class EmployeeBasic implements Serializable {

    private static final long serialVersionUID = 1L;

    private String id;
    private String name;
    private String department;
    private int    age;
}

// CLASS 2 - Employee Salary Information
@Data
public class EmployeeSalary implements Serializable {

    private static final long serialVersionUID = 1L;

    private String id;
    private float  salary;
    private float  bonus;
}
Here is the response object for employees,
{
	"employees": [
		{
			"age": 41,
			"department": "Security",
			"id": "1000",
			"name": "Charlotte Black"
		},
		{
			"age": 38,
			"department": "Human Resources",
			"id": "1001",
			"name": "Daniel White"
		}
	]
}
Next we will see what the salary looks like for Employee ID 1000.
{
	"bonus": 8200.00,
	"id": "1000",
	"salary": 410000.00
}
Client Code
Before we start this section, let’s talk about Rest template. Again, let me add that caveat I already mentioned before. For new projects, use RestClient. RestTemplate has been deprecated as of Spring Framework 5.
We will start with the basic RestTemplate bean.
@Configuration
public class AppConfig {
  	@Bean
    public RestTemplate restTemplate() {
      	final HttpComponentsClientHttpRequestFactory factory = new HttpComponentsClientHttpRequestFactory();
        factory.setReadTimeout(5000);
        factory.setConnectTimeout(5000);

      	final RestTemplate restTemplate = new RestTemplate(
        	new BufferingClientHttpRequestFactory(factory)
      	);
      	return restTemplate;
    }
}
We will keep on updating this bean later as we go. Just as a side note, we do not need to add BufferingClientHttpRequestFactory, but I added it for convenience. What it gives us is reading the RestTemplate response more than once.
Ok, time to get all the employees. Before that we will define on more bean to consolidate employee salary information.
@Data
public class EmpData implements Serializable {

    private static final long serialVersionUID = 1L;

    private String id;
    private String firstName;
    private String lastName;
    private String department;
    private int    age;
    private float  salary;
    private float  bonus;
    private boolean flagged;    // Getting 8% bonus
}

// This Class is just a List of the above for returning
@Data
public class ListEmpData implements Serializable {

    private static final long serialVersionUID = 1L;

    private List<EmpData> empSalaries;
}
That being done, we are ready to write the controller to return data.
@Slf4j
@Controller
public class ClientController {
  	@Autowired
    RestTemplate restTemplate;

  	@GetMapping(value = "/empsalary", produces = MediaType.APPLICATION_JSON_VALUE)
    public ResponseEntity<ListEmpData> getSalary() {
      	long startTime = System.currentTimeMillis();

      	// Get all Employees
        final ListEmpData employees = restTemplate.getForObject(
            GET_ALL_EMPLOYEES_ENDPOINT, ListEmpData.class
		);

      	return ResponseEntity.ok().body(employees);
    }
}
Did you notice something? Server returned a Type of EmployeeBasic POJO, but what we are accepting here is List of EmpData POJO. Where did the conversion happen? Object mapper will not be able to convert between the objects without intervention.
To achieve this we will use ClientHttpRequestInterceptor interface provided by Spring. This interceptor is triggered for RestTemplate invocation and can be used for modifying both request and response signatures.
Example of request enhancement may include adding a custom header, logging the request or adding a authentication token. This way you do not have to keep on using the same code in multiple different places giving one more reason why Spring AOP is an excellent way of programming.
Defining the Interceptor
This is one of the core pieces of the code. So, I will keep line numbering on, so that we can discuss the code further.
@Slf4j
@Order(1)
public class CustomResponseEnricher
    implements ClientHttpRequestInterceptor {

    final static ObjectMapper mapper = new ObjectMapper();

    @Override
    public @NonNull ClientHttpResponse intercept(
        @NonNull HttpRequest request,
        @NonNull byte[] body,
        @NonNull ClientHttpRequestExecution execution) throws IOException {

        // Pre Execution here
        final ClientHttpResponse response = execution.execute(request, body);
        // Post Execution here
        if (request.getURI().toString().endsWith("/employees")) {
            ClientHttpResponse modifiedResponse = new ClientHttpResponse() {
                @Override
                public @NonNull HttpHeaders getHeaders() {
                    final HttpHeaders headers = response.getHeaders();
                    headers.add("Content-Type", "application/json");
                    return headers;
                }

                @Override
                public @NonNull InputStream getBody() throws IOException {
                    final ListEmployees empbasic = mapper.readValue(response.getBody(), ListEmployees.class);
                    // Process to add some static data and change response body
                    final List<EmpData> salaries = new ArrayList<>();
                    empbasic.getEmployees().forEach(emp -> {
                        final String[] nameParts = emp.getName().split(" ");
                        final EmpData empSalary = new EmpData();
                        empSalary.setId(emp.getId());
                        empSalary.setFirstName(nameParts[0]);
                        empSalary.setLastName(nameParts[1]);
                        empSalary.setAge(emp.getAge());
                        empSalary.setDepartment(emp.getDepartment());
                        salaries.add(empSalary);
                    });
                    final ListEmpData empSalaries = new ListEmpData();
                    empSalaries.setEmpSalaries(salaries);
                    return new ByteArrayInputStream(mapper.writeValueAsBytes(empSalaries));
                }

                @Override
                public @NonNull HttpStatus getStatusCode() throws IOException {
                    return response.getStatusCode();
                }

                @Override
                public int getRawStatusCode() throws IOException {
                    return response.getRawStatusCode();
                }

                @Override
                public @NonNull String getStatusText() throws IOException {
                    return response.getStatusText();
                }

                @Override
                public void close() {

                }
            };
            return modifiedResponse;
        }
        return response;
    }
}
In traditional Spring AOP style, the joinpoint in this case is Line #15. Anything before this line will be part of the request (request manipulation). Anything after that will be for response. From our perspective, we really don’t have anything to do before the REST call is executed. So, we go into call execution immediately on Line #15. Whatever we are doing here is very specific to Employees request, so, we make sure to only enrich data when the call made was to /employees endpoint. This is done in line #17.
Line #20 defines the first overridden method. This is used for manipulating the header values in response. The only thing we tell downstream process is that this is a application/json type of response.
Line #27 is the most important. Here we are changing the entire request. The value received from service is a list of EmployeeBasic objects. We convert it to a list of EmpData objects. Line #30 through Line #47 takes care of this.
Rest of the methods are returning the values that we got from the base response. This ensures that any error codes received is sent back. We have not done any error check in the methods. Ideally we should gave done some additional error handling.
Adding the Interceptor
Now that we have the interceptor. How do we tell the RestTemplate to use it? Let’s update the configuration once more.
@Configuration
public class AppConfig {
  	@Bean
    public RestTemplate restTemplate() {
      	final HttpComponentsClientHttpRequestFactory factory = new HttpComponentsClientHttpRequestFactory();
        factory.setReadTimeout(5000);
        factory.setConnectTimeout(5000);

      	final RestTemplate restTemplate = new RestTemplate(
        	new BufferingClientHttpRequestFactory(factory)
      	);

      	List<ClientHttpRequestInterceptor> interceptors = restTemplate.getInterceptors();
        if (interceptors.isEmpty()) {
            interceptors = new ArrayList<>();
        }

        interceptors.add(new CustomResponseEnricher());
        restTemplate.setInterceptors(interceptors);
        return restTemplate;
    }
}
In this newly added code, we are adding the newly created class in the interceptors queue. We can add any number of interceptors as we want. The order of load can be managed by the Order directive. Although we have only one interceptor, please refer to the code above. I have still added Order to demonstrate how this can be used.
With everything in place. In the interceptor above, we have already taken care of the following requirements.
- Split Name into First and Last Names
- Added Salaries (we will populate values later)
Getting the Salaries
We have to make API calls again to get salaries for each employee. Unfortunately network calls are the most expensive from time perspective. Let’s see how we do.
We will define a new Service that will update the Salary object passed by reference.
@Slf4j
@Service
public class SalaryUpdateService {

    private static final String GET_SALARY_FOR_EMPLOYEE = "http://localhost:8080/salary/{id}";

    @Autowired
    RestTemplate restTemplate;

    public void updateSalaryComponent(final EmpData sal, final String empId) {
        final String salUrl = GET_SALARY_FOR_EMPLOYEE.replace("{id}", empId);
        final EmployeeSalary esal = restTemplate.getForObject(salUrl, EmployeeSalary.class);
        if (esal != null) {
            sal.setSalary(esal.getSalary());
            sal.setBonus(esal.getBonus());
        }
    }
}
Now we simply have to call this method to update salary and bonus. Let’s do that next. We will start extending the current method of the controller.
@GetMapping(value = "/empsalary", produces = MediaType.APPLICATION_JSON_VALUE)
public ResponseEntity<ListEmpData> getSalary() {
	long startTime = System.currentTimeMillis();

    // Get all Employees
    final ListEmpData employees = restTemplate.getForObject(
      	GET_ALL_EMPLOYEES_ENDPOINT, ListEmpData.class
    );

  	// Now for each we need to update salaries
  	if (employees != null) {
        for (final EmpData sal : employees.getEmpSalaries()) {
            final String empId = sal.getId();
            salUpdateSvc.updateSalaryComponent(sal, empId);
        }
    }

  	long endTime = System.currentTimeMillis();
  	log.info("Regular Task: Response Time (ms): {}", (endTime - startTime));
    return ResponseEntity.ok().body(employees);
}
That’s all there is to it. Let’s see how much time it approximately takes to run this method. I am adding below the times taken in ms to run this REST call 10 times.
Regular Task: Response Time (ms): 2618
Regular Task: Response Time (ms): 1386
Regular Task: Response Time (ms): 1121
Regular Task: Response Time (ms): 999
Regular Task: Response Time (ms): 954
Regular Task: Response Time (ms): 947
Regular Task: Response Time (ms): 972
Regular Task: Response Time (ms): 965
Regular Task: Response Time (ms): 967
Regular Task: Response Time (ms): 981

Average: 1191 ms
Not too shabby. But can we make it faster?
The Pooling behind RestTemplate
When you create a RestTemplate, it is backed by a Connection Pool. The default for this is 5 connections per route and 25 maximum connections. Route is synonymos here to host calling.
Let’s try to see if we can increase this pool size. We will make it 100 simultaneous connections. We start updating our RestTemplate bean once more.
@Configuration
public class AppConfig {

  	public static final int MAX_CONNS = 100;

  	@Bean
    public RestTemplate restTemplate() {
      	// The pool gets customized here
      	// We test on one host so just give it all connections as well
      	final PoolingHttpClientConnectionManager poolConnMgr = new PoolingHttpClientConnectionManager();
        poolConnMgr.setMaxTotal(MAX_CONNS);
        poolConnMgr.setDefaultMaxPerRoute(MAX_CONNS);

      	// Pool gets added to a Custom HTTP client
        final CloseableHttpClient httpClient = HttpClients.custom()
            .setConnectionManager(poolConnMgr)
            .build();

      	// We add this client to the Request Factory
      	final HttpComponentsClientHttpRequestFactory factory = new HttpComponentsClientHttpRequestFactory(httpClient);
        factory.setReadTimeout(5000);
        factory.setConnectTimeout(5000);

      	// Remember to add this factory to the buffering client as well!
      	final RestTemplate restTemplate = new RestTemplate(
        	new BufferingClientHttpRequestFactory(factory)
      	);

      	// Interceptor - we discussed earlier
      	List<ClientHttpRequestInterceptor> interceptors = restTemplate.getInterceptors();
        if (interceptors.isEmpty()) {
            interceptors = new ArrayList<>();
        }

        interceptors.add(new CustomResponseEnricher());
        restTemplate.setInterceptors(interceptors);
        return restTemplate;
    }
}
This by itself will not give much of a performance boost on my single host. So, we will try to now add some multi threading into the mix.
Adding Thread Executor Pool
We will create a new endpoint that will use a thread pool executor to open up 100 (MAX_CONNS above) threads and try to get the salaries for employees. This means instead of 5 simultaneous calls we will do 100 simultaneous calls. Let’s see it.
First thing is to update the SalaryUpdateService. We create a new method that accepts the RestTemplate as a parameter.
@Slf4j
@Service
public class SalaryUpdateService {

    private static final String GET_SALARY_FOR_EMPLOYEE = "http://localhost:8080/salary/{id}";

    @Autowired
    RestTemplate restTemplate;

    public void updateSalaryComponent(final EmpData sal, final String empId) {
        updateSalaryComponent(restTemplate, sal, empId);
    }

    public void updateSalaryComponent(final RestTemplate trTemplate, final EmpData sal, final String empId) {
        final String salUrl = GET_SALARY_FOR_EMPLOYEE.replace("{id}", empId);
        final EmployeeSalary esal = trTemplate.getForObject(salUrl, EmployeeSalary.class);
        if (esal != null) {
            sal.setSalary(esal.getSalary());
            sal.setBonus(esal.getBonus());
        }
    }
}
Let’s first add a Task that will handle the service call.
@Slf4j
public class SalaryUpdateTask implements Runnable {

    final RestTemplate restT;
    final EmpData salary;
    final String empId;

    public SalaryUpdateTask(final RestTemplate restT, final EmpData parm, final String empId) {
        this.restT = restT;
        this.salary = parm;
        this.empId = empId;
    }

    @Override
    public void run() {
        final SalaryUpdateService salUpdateSvc = new SalaryUpdateService();
        salUpdateSvc.updateSalaryComponent(this.restT, this.salary, this.empId);
    }
}
Please note that we have also sent the RestTemplate as a constructor parameter since we cannot autowire it in this task. The task itself is a pure Java implementation.
Next we will use this task and we create the new endpoint for calling threaded version of the Employee information rest call.
@GetMapping(value = "/empsalarypool", produces = MediaType.APPLICATION_JSON_VALUE)
public ResponseEntity<ListEmpData> getSalaryPool() {

  	final ThreadPoolExecutor executor = (ThreadPoolExecutor) Executors.newFixedThreadPool(AppConfig.MAX_CONNS);

  	long startTime = System.currentTimeMillis();

  	// Get all Employees
  	final ListEmpData employees = restTemplate.getForObject(
    	GET_ALL_EMPLOYEES_ENDPOINT, ListEmpData.class);

  	// Now for each we need to update salaries
  	if (employees != null) {
    	for (final EmpData sal : employees.getEmpSalaries()) {
      		final String empId = sal.getId();
      		final SalaryUpdateTask task = new SalaryUpdateTask(restTemplate, sal, empId);
      		executor.execute(task);
    	}
  	}

  	// Accept no more
  	executor.shutdown();

  	// Wait for Termination
  	try {
    	if (!executor.awaitTermination(60, TimeUnit.SECONDS)) {
      		log.error("All Completed");
    	}
  	} catch (InterruptedException e) {
    	log.error("Pool Interrupted", e);
    	executor.shutdownNow();
  	}

  	long endTime = System.currentTimeMillis();
  	log.info("Pool Task: Response Time (ms): {}", (endTime - startTime));
  	return ResponseEntity.ok().body(employees);
}
Here on Line #4, we create a Thread Pool Executor. On Line #17 we start pushing the salary calls to the executor which in turn invokes the declared task. Line #22 onwards, we shutdown the executor and give the task 60 seconds to complete. We know for the task in hand, we should be able to complete it much sooner.
Let’s see how this works.
Pool Task: Response Time (ms): 840
Pool Task: Response Time (ms): 510
Pool Task: Response Time (ms): 349
Pool Task: Response Time (ms): 321
Pool Task: Response Time (ms): 298
Pool Task: Response Time (ms): 295
Pool Task: Response Time (ms): 292
Pool Task: Response Time (ms): 280
Pool Task: Response Time (ms): 287
Pool Task: Response Time (ms): 286

Average: 376 ms
That’s a 68% performance gain over the previous one using just 100 simultaneous threads.
Conclusion
In this blog we showed couple of ways of enriching REST response when using RestTemplate.
- Using ClientHttpRequestInterceptor to modify request and response shapes
- When we need API calls to get additional data, showed how to optimize and speed up those calls as well
RestClient uses the same interfaces. This code can be used as is with minor tweaks to the bean. Hope you found this useful. Ciao for now!