In our last blog, we have used Python’s capabilities to read the voices present on our MacBook and play audio using it. We have used the audio capabilities exposed by API using a Python wrapper.
This time I thought, I will post the same capability using browser only. Unfortunately, time constraints still haunts me, and I cannot have too exhaustive a blog. But with some free time during couple of evenings, I came up with a very simplistic example, sans error checking, to present audio playback using only browser and no backend involved. I will be using JQuery for convenience, but it is not required.
Use Case
Since we are presenting audio capabilities, what better than to build a chat reader? Also, WhatsApp being a standard format, I decided to just write something to run on WhatsApp export format.
Let’s see how lines from WhatsApp looks like. I exported some chats from WhatsApp and see there are two distinct variants. The first one is a regular line.
[7/23/25, 1:01:01 AM] John Doe: That was a real funny joke!
The part in square brackets is the date followed by the person sending message. The last part is the real message.
The second format is a bit odd. It contains Unicode characters.
U+200E[7/23/25, 1:01:01 AM] Jane Doe: U+200E<attached: 00026518-PHOTO-2025-07-23-01-01-01.jpg>
What is not visible in this line is the presence of two U200E characters. So, I added them specifically where they are in that line. This represents an attachment that is also exported with the chat. For the simplicity of the blog, I have ignored all attachments.
The way we want to build it is as follows,
- Load file in memory
- For each persona, accept a set of voice and image selection
- Store this as a map
- Parse in memory whatsapp file and start playing the text based on user selected voice. Also, display the persona avatar selected by user
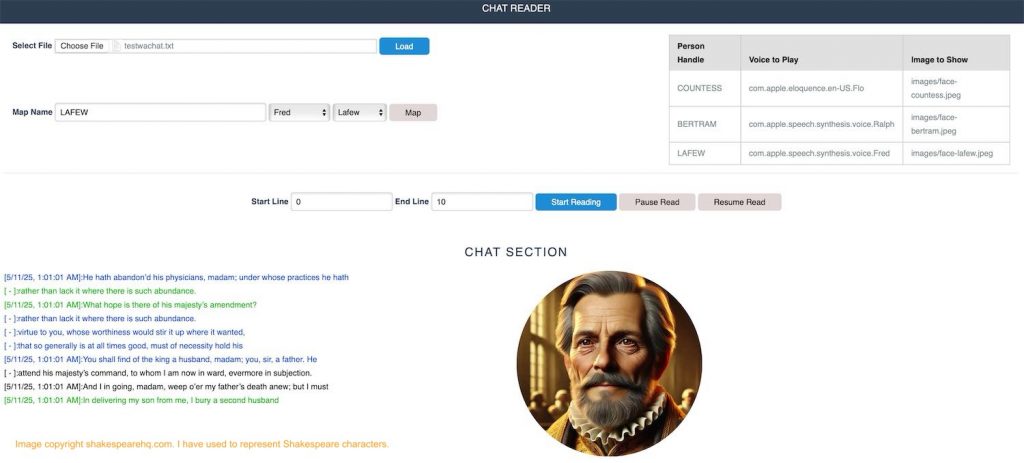
User Interface
I built a very basic HTML/ CSS UI as seen on top. You have a file input control that can load a _chat.txt file in memory. A set of controls is given to map a name to corresponding voice and image. All added sets are displayed on the right hand side.
The lower part of the form is used to show the chat as it is played. The left side displays the text that is currently being read. On the right hand side we have the avatar for the persona.
The entire UI was built using Pure CSS. I am not going to put the code for HTML here as it will not add much value. I will just be going through the code for javascript.
Web Speech API
All major browsers support Web Speech API. For this project we will use part of this. This API also exposes capabilities for text-to-speech. We will use speechSynthesis to initiate this API and then use SpeechSynthesisUtterance to playback a text.
It also exposes quite a few methods to check, pause, resume or stop playback. We will only use some of them. So, let’s start with the project.
Implementation
Web Speech API
FIrstly, we will initialize the Web Speech API. We can do this globally.
const speech = window.speechSynthesis;
This is the initial call to get the speech API instance. We will now use this to initially get the voices available.
loadVoices = function() {
  var voices = speech.getVoices();
  $.each(voices, function(i, item) {
    if (item.lang === "en-US") {
      $('#stacked-voice').append($('<option>', {
        value: item.voiceURI,
        text : item.name
      }));
    }
  });
};
In this getVoices() gets all the voices available in the system. Since I am using MacOS, I only get sounds available on MacBook. We are only interested in english vocal sounds, so we will selectively use en-US voices. Rest of the code just populates a dropdown box. We can ignore that part of the code.
Next we will show the method that is used to speak the text. It is a bit on the longer side as I have shown available methods, but not everything is needed.
speakText = function(txt, voice) {
  if (speech.speaking) {
    showMessage('Already reading....');
    return;
  }

  const reader = new SpeechSynthesisUtterance(txt);

  reader.onstart = function(evnt) {
    showMessage(txt);
    isReadingLine = true;
  }

  reader.onend = function(evnt) {
    showMessage('...');
    isReadingLine = false;
  }

  reader.onpause = function(evnt) {
    showMessage('Pause reading...');
  }

  reader.onresume = function(evnt) {
    showMessage('Resume reading...');
  }

  reader.onerror = function(evnt) {
    showMessage('Read error: ' + evnt.error);
    isReadingLine = false;
  }

  reader.voice = voice;
  speech.speak(reader);
};
In this method we initialize the SpeechSynthesisUtterance which takes in the text to be played and creates an utterance out of it. When we invoke speak, it will start playing the text. This is played asynchronously, and we can get status of the call using the following methods provided,
- speaking: Attribute that indicates if an utterance is currently being played
- paused: Attribute that indicates that speech is currently paused
- speak(): Method to start speaking
- pause(): Method to pause till resume is called
- resume(): Method that will resume speech from where it was paused
- stop(): Stop current playback
- onstart(): Callback invoked when utterance is started
- onend(): Callback invoked when utterance is finished
- onpause(): Callback when we request pause for the playback
- onresume(): Callback when we request resume for the playback
- onerror(): Callback invoked when there is an error
This is the entirety for Audio TTS part that we will be using in this project.
Whatsapp Processing
Load the file that is selected by the user. It stores the file content in memory for later parsing. This is the load event for file input control.
$('#loadfile').bind('click', function(evt) {
  evt.preventDefault();
  var fileInput = $('#fname')[0];
  if (fileInput.files.length === 0) {
    alert('No file selected...');
    return;
  }

  var file = fileInput.files[0];
  var reader = new FileReader();
  reader.onload = function(evnt) {
    fileText = evnt.target.result;
    console.log('Loaded file...');
  };

  reader.onerror = function(evnt) {
    alert('File Read Error...');
  };

  reader.readAsText(file);
});
Now each line is parsed using regex. As I said before, there are two different variations. Let’s parse each of them.
parseLine = function(one) {
const waRegRegex = /^\[(.+)\] (.+): (.+)$/;
const waAttRegex = /^\[(.+)\] (.+): (.+)$/;
var match = one.match(waRegRegex);
if (match) {
if (match[3].includes("http") || match[3].includes("https")) {
return {
type: 'L',
date: match[1],
name: match[2].trim(),
text: match[3]
};
} else {
return {
type: 'R',
date: match[1],
name: match[2].trim(),
text: match[3]
};
}
} else {
// Try as Attachment
var match = one.match(waAttRegex);
if (match) {
return {
type: 'A',
date: match[1],
name: match[2].trim(),
attach: match[3]
};
} else {
// Just return TEXT
return {
type: 'R',
date: '',
name: '',
text: one
};
}
}
return null;
}We have two different regex. We first try as a regular line. If that fails, we will process the line as attachment. The code is self explanatory, we just try the regex on the line. If the first try fails, we try the next one.
Reading
Last but not the least, using these methods, we are reading the file using the TTS API given above.
startReading = async function() {
  if (!isReadingLine) {
    var curChat = fileLines[currentRecord++];
    var ptext = parseLine(curChat);
    if (ptext.text !== undefined) {
      if (ptext.type === 'R') {
        if (ptext.name !== '') {
          precord = voiceMap.get(ptext.name);
          $('#chatmain').html("<font color='#" + precord.color + "'>[" + ptext.date + "]:" + ptext.text + '</font><br/>' + $('#chatmain').html());
          speakText(ptext.text, precord.voice);
          lastPerson = precord;
          $("#photo").attr("src", getRandomImage(precord.image));
        } else {
          // Continuation
          $('#chatmain').html("<font color='#" + lastPerson.color + "'>[ - ]:" + ptext.text + '</font><br/>' + $('#chatmain').html());
          speakText(ptext.text, lastPerson.voice);
        }
      } else if (ptext.type === 'A') {

      } else if (ptext.type === 'L') {

      }
    }
  }
  if (currentRecord < totalRecords) {
    sleep(500).then(() => {
      startReading();
    });
  }
}
This method, if you notice, is declared to be asynchronous. This is because this method uses asynchronous calls within it. It will keep on recursively calling itself till the exit criteria is reached. Exit criteria is reached when we have no more lines. If no audio is playing, we grab the next line from file, parse it and if it is part of a regular line, we will play it. We can extend it to also show images, but for now I have not added that part, reason being, that would potentially need a server call to fetch the image from the server.
Finale
Well, that’s all to it. Very basic implementation to read through whatsapp chat files. I had already said this is going to be a short blog. I will try to put the entire source code in my github page.
Hope this helps someone. Ciao for now!