I am still a console person. Even at work, the first thing I will do is to install a Unix like console on my Windows desktop so that I can be more productive. You can say I am still stuck in stone age of computing.
It all started because that is what I started my life with. On my first job, I was introduced to an operating system called HP-UX running on HP 9000 servers (at that time they were called mini supers). We used to log in to dumb terminals, which means we just connected to that main server and what we got was a monitor and keyboard. No mouse of course for the curious who is asking. All our UI designs revolved around curses.h, which could be used to map cursor positions on screen. Those were days of simplicity.
Unfortunately old habits die hard. Since that time, I could never come out of the comfort zone of console. When you want to manipulate data, a sane person would just use Microsoft Excel. Not me, I will export data to CSV, and write a simple AWK program to get whatever I need.
Anyway, moving out of that, for this blog, I wanted to put some GIT commends that I still use from command line instead of using an IDE to help me. We will start with sample use cases instead of just putting some random commands.
How does GIT work?
GIT is unlike other source control systems. File changes are snapshots and each change is maintained with the checksum for each file. What that means is that final committed code is always stored full instead of delta from the previous file.
GITs structure is also different. It maintains files in different stages.
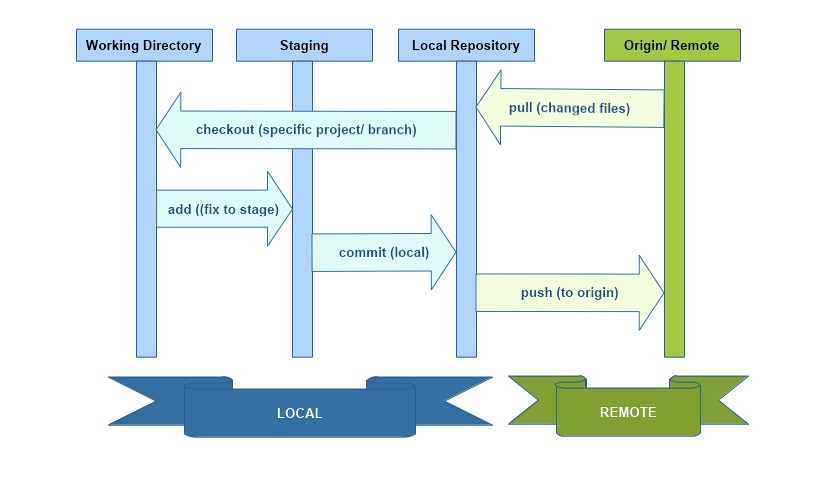
GIT can work entirely local, but ideally in a corporate environment you will also see a remote repository, or origin as its called in GIT parlance. This is indicated by green in the diagram above. You will normally pull or push codes from this repository to your local. GIT local consists of three stages. The code where we work will be the working directory . This is the code that is affected when you make changes. If satisfied with the change, we can move this code to GIT staging area. This is not committed code either. If you think that this code will cause issues, you can stash all your changes which creates a copy and rolls back to original commit. Finally the third stage is local repository. When a code is committed, a new version is created and stored in local.
With all these work that is being done behind the scenes, of course it comes with a plethora of commands that does various things. We will just handle some regular scenarios here.
Naming Conventions
So, you got a new project and you have a repository that you need to pull from. You know that you will be working out of develop branch. A point to note here. GIT normally has a master branch that is created when a repository is created. Conventionally, development work is done in develop branch. Again, convention prevails in branch naming as well. We will always use some prefixes against the names that indicate what purpose this branch serves. Here are some commonly followed naming standards,
| Prefix | Example | Description |
|---|---|---|
| feature/ | feature/user-login | This describes a broad feature that needs to be introduced to the application |
| bugfix/ | bugfix/duplicate-calls | Bugfix are non critical bugs that are normally worked on along with other features. They can go in with the next release |
| hotfix/ | hotfix/oom-resolution | This is a critical production bug. Normally it is changed right on the last released code and deployed on priority |
| release/ | release/user-login | This is the code ready to be released to production |
We can also keep the JIRA ID as part of the name. For example imagine we have a feature request to add a role based authentication and the story is under ID APP-1234. We can have the name as feature/APP-1234-role-based-auth. These of course vary across organizations and the tools being used.
We deviated from the main topic a lot. Let’s get back to our examples.
A Fresh Start
We will go back to you as a new developer and have to checkout sources to start development. You know the repository and that you need to clone off develop branch.
λ git clone ssh://git@github.com:1234/main/myrepo.git ./myrepo
λ git checkout -b develop
Ok, that checked out the files from origin to local and using the second command we switched to use develop branch. But you cannot work on develop branch. So, ideally we will be creating a new branch. Flag -b switches to that branch after checking it out.
λ git checkout -b feature/my-useful-work origin/developThis creates a local branch only. Remember that this does not exist in remote. We do all our work on this branch and when we are ready to commit, we will do a few things from root of the project.
λ git add —-all .
λ git commit -m “My useful work ready now"
λ git push -u origin feature/my-useful-work
In this set, we added all files to staging first. Then we committed them to local repository along with a comment. Finally, it was pushed to origin. We had to specify upstream destination as this was a new branch and it did not exist in remote.
Of course we could have merged all of these changes from develop as well.
λ git merge developOr maybe we wanted to see what changed first,
λ git ls-files --others --exclude-standardDo you want to delete this branch now? We can always delete local branches as such.
λ git branch -d feature/my-useful-workThis command will show difference of files.
λ git diffListing Branches
Let’s look at some commands that can help us get more details on the branches. Here are the three basic flags to get branch listings.
λ git branch
λ git branch -r
λ git branch -a
The first (without ant flags) lists all branches in local. The one with -r will list every branch in remote/ origin. But if we want to get all branches we will use -a.
If we need more details on the branches. This will include last commit details as well.
λ git branch -vvYou can also get more details on remote branch as follows.
λ git show-branchSearch for a Commit
Before we start this topic, let’s talk hashing. When GIT creates a checkpoint it will create a forty character SHA hash that includes files checked in, changes etc. It uniquely identifies all characteristics which when changed alters the hash.
However, GIT also has a short hash. This is normally 7 characters within a project. It generally uniquely identifies a check in. GIT responds with this 7 character SHA hash in the following commands. While working on the following commands, remember hashing.
Let’s start with a command to list all histories.
λ git log --oneline --graph --allThis will graph all branches. Let’s assume we want to search for APP-123 in all checkins.
λ git log --oneline --all | grep APP-123This returns a list of all checkins that contains this text. Sample output will look like this.
ea62df1 [APP-123] - User Role based auth changes.
176a5d0 [APP-123] - User Role based auth changes.
We see the two SHA tokens in this. This is of course searching on commit messages. We will have to investigate one at a time. Let’s figure out what this branch is that contains the first one.
λ git branch --contains ea62df1This should return the branch name where this is located. Checkout this branch. Assume this was feature/role-based-changes is the branch.
λ git checkout feature/role-based-changesNow we can start looking at all checkins for this branch.
λ git show-branchCouple more commands
Finally let’s see some commands for rollback. One useful command is resetting to the branch. This is done by,
λ git reset -—hardYou can also stash changes. This also saves a backup copy that can be restored later if required.
Conclusion
That’s it for now. I may keep on adding more commands later as I remember them or when I use them. Ciao for now!