Even though I always knew about push notifications, I never had a necessity to build one. Until of course one day I just brought it up in conversation for one of the architecture I was proposing. So I thought I should build one so I have all information I need for the design. I will put my findings in this blog hoping it will help someone.
We will start with the basics. What is a web push notification?
Understand the Concept
Web push notifications, extensively used by PR and marketing team of the vendor, is a way to send messages to individual recipients even when the vendor site is not open on the recipient browser. It will popup on the browser as a notification. Every browser is different and the notification is different, but eventually they all serve the same purpose.
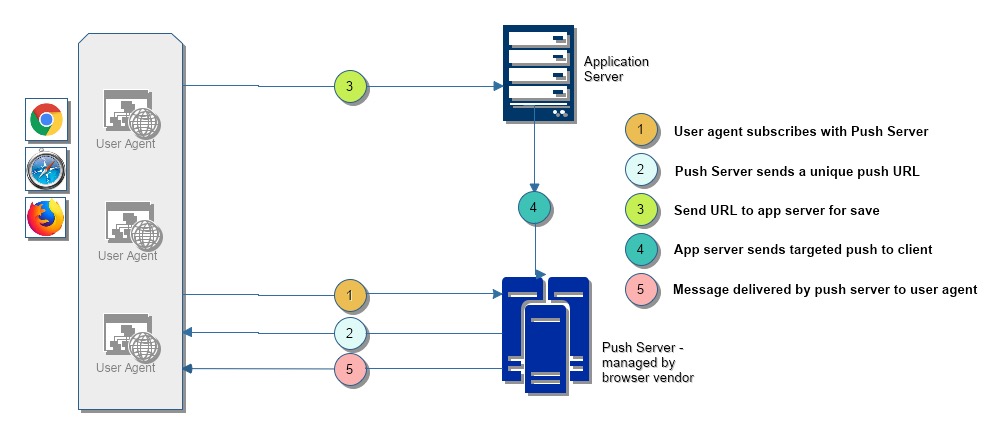
Diagram above shows how a push notification works in practice. There are three different actors involved in this process.
- User Agent: Also called the web browser, is the primary component. This is where the user will be shown the notification and also an application can run to setup notification.
- Push Server: This is managed by the browser vendor. User agent will subscribe with the push server for getting push messages.
- Application server: This is where application will be hosted. Normally it will store the private/ public keys combination and also the Web Push endpoint that was provided by vendor push server. It will do the application processing and send push messages to the push server to be delivered to the customer.
Now that we understand these terms, let’s define what the flow looks like from user perspective.
- User agent subscribes with the Push Server. We send a public key to the server.
- Server sends us back a push endpoint. Along with this, we will receive back a Prime 256 Elliptic Curve Diffie-Hellman (P256 ECDH) public key and an authentication secret.
- User Agent sends this endpoint and keys to the server to save.
- Application sever will initiate a push message request to the endpoint when required. I also encrypts and signs the message using the public key.
- Push server will forward the message to the user agent. User agent pops up the message.
Components of a Notification
Notification displays differently on different browsers. I am currently working on Chrome on a MacBook and let me show the three states that notifications can have.
The first one here is the default notification that pops up on the browser. It consists of an icon on the right side, title on top, sending URL as the next line and finally body of the notification. If you have action buttons, on MacBook, there is a menu that displays on bottom right as Options. These action buttons will display under options. This is state 2.
You can also expand the notification. This should ideally show the image, but on MacBook chrome, it shows the larger version of the icon.
In the text above, you may be wondering why I have highlighted a lot of the texts. Let’s answer that. I have highlighted those texts, because they are part of options that can be sent with a notification. Let us take the full structure.
Notification Options
| Tag | Notes |
| actions | This contains an array of action items. Action items are defined with the following: a) action: User action to be taken b) title: What to display for the action item c) icon: Icon to display with it |
| badge | URL for an image to display an indicator when the full notification cannot be displayed. This is used mostly on phones. This should be a 96x96px square image (recommended). |
| body | Main notification text. |
| data | You can add any custom data here that can be fetched from the application |
| dir | Text direction, can be auto, left or right. |
| lang | Language for the notification. |
| icon | URL for the icon to display along with the notification. Recommended 192x192px image. |
| image | Larger image that can be displayed in the expanded form of notification. This image should at least be 800px wide. |
| renotify | This flag indicates if the user should be notified when an old notification is replaced by a new one. |
| requireinteraction | By itself, notifications will close on their own. If we set this value, notification will have to be interacted with and closed by user. |
| silent | This delivers the notification silently to the user. No sound or vibration will be played. |
| title | Title of the notification. |
| vibration | Specified by an array if integers to indicate vibration pattern. |
Let’s see some code
Notifications uses a different JavaScript standard also to receive and display messages. It uses service workers. Services Workers acts as proxy between the web server and application. Primarily service workers mitigate network connectivity issues. They can use the JavaScript cache utility to also provide offline access to some resources.
So the first step would be to register a service worker. Assume that we have created a JavaScript file as sworker.js. To register this file as a service worker, we will use the following code.
if ('serviceWorker' in navigator && 'PushManager' in window && 'Notification' in window) {
  showLogs("Service Worker, Notification and Push Manager supported...");

  navigator.serviceWorker.register('./js/sworker.js')
    .then((registration) => {
    showLogs("Service Worker is registered...");
    swRegistration = registration;
    const sw = registration.installing || registration.waiting || registration.active;
    sw.postMessage("ServiceWorker Registered...");

    // Message
    navigator.serviceWorker.addEventListener('message', (evt) => {
      msgText.html(evt.data);
      bigMessage.fadeIn("slow");
    });
  });

  $(".modal").addClass("is-active");
} else {
  showLogs("Push Manager NOT supported...");
  btnSubscribe.attr("disabled", true);
}
Since we are creating a Notification application here, on Line #1 we have also checked for Web Push and Notification APIs. On Line #18, I am just opening a custom modal dialog.
It is customary for Web Notifications to display a message asking user if they want to subscribe to notifications, and what it gives them. This gives a better chance for the user to accept the notification dialog shown by the browser. That is what I am doing on Line #18.

To build this dummy web page, I used Bulma css for convenience. We will subscribe for Notification, if the user clicks on Allow.
Notifications Permission
$(".modal").removeClass("is-active");

// Register to Push
const options = {
  userVisibleOnly: true,
  applicationServerKey: urlBase64ToUint8Array(serverPublicKey),
};

swRegistration.pushManager.subscribe(options)
  .then((pushSubscription) => {
  showLogs(
    'Received PushSubscription: ',
    JSON.stringify(pushSubscription)
  );

  // Send it to Server
  // Not implemented
}).catch(function(err) {
  showLogs("Error registering push service: " + err);
  return;
});

// Notifications
if (Notification.permission !== "granted") {
  Notification.requestPermission()
    .then((perm) => {
    if (perm === 'granted') {
      showLogs("Permission granted...");

      // Show one notifcation
      swRegistration.showNotification(
        "Acknowledge",
        {body: "Thank you for subscribing to notification..."}
      );
    } else {
      showLogs("Permission declined...");
    }
  });
} else {
  showLogs("Permission granted...");
}
There are some interesting things in the code above. Let’s first talk about the highlighted line. We have to send a VAPID key to the pushManager to subscribe. So, what the heck is a VAPID key?
We use VAPID (Voluntary Application Server Identification) key (spec here) to send authentication data to the server. It is a signed JWT signed using Prime 256 Elliptic Curve Cryptographic token (algorithm: ES256). The token itself contains the following three values:
{
  "aud": <Audience URL>,
  "exp": <Expiry Timestamp>,
  "sub": <Subject, ideally just an email for the developer>
}
On Line #9, we are doing the push manager subscription. Starting Line #24, we are subscribing to the Notification service itself. If subscription is successful, on Line #31, we acknowledge that notification service completed by sending the first notification to the user.
Service Worker
The main event to listen from on service worker is the push event. When server sends a message, we intercept this message using the push event. So, here is my implementation of push capture. I have sent the message from server in a specific format, so that is what I am parsing out.
self.addEventListener('push', (event) => {
    const data = event.data;
    const msg = JSON.parse(data.text());
    console.log(msg);
    self.registration.showNotification(msg.title, msg);
});
When sending a message from the server, I have made sure to populated required fields. This is server code in Java. It uses web-push library using maven dependency control. ‘map’ is an instance of ObjectMapper from jackson library.
public void sendNotification(final String message, final Subscription sub) {
  try {
    // Create Notification Options
    final ObjectNode action1 = map.createObjectNode();
    action1.put("action", "https://suvcodes.com/ai-art-websites-creating-realistic-art-from-text/");
    action1.put("title", "AI Art");
    action1.put("type", "button");
    action1.put("icon", "../images/button1.png");

    final ObjectNode action2 = map.createObjectNode();
    action2.put("action", "https://suvcodes.com/markov-chain-and-auto-text-generation/");
    action2.put("title", "Markov Chain");
    action2.put("type", "button");
    action2.put("icon", "../images/button2.jpg");

    final ArrayNode actions = map.createArrayNode();
    actions.addAll(Arrays.asList(action1, action2));

    ObjectNode urls = map.createObjectNode();
    urls.put("url", "https://suvcodes.com/");

    final ObjectNode root = map.createObjectNode();
    root.put("body", message);
    root.put("title", "Server Notification");
    root.put("icon", "../images/logo-192x192.png");
    root.put("image", "../images/butterfly.jpg");
    root.set("actions", actions);
    root.set("data", urls);

    webPushSvc.send(
      new Notification(
        sub.endpoint, sub.keys.p256dh, sub.keys.auth,
        map.writeValueAsBytes(root)
      )
    );
  } catch (GeneralSecurityException | IOException | JoseException |
           ExecutionException | InterruptedException ex) {

    log.error("WebPushService::sendNotification", ex);
  }
}
We handle clicks on notification using following code.
self.addEventListener('notificationclick', (event) => {
    event.notification.close();

    // Calculate URL
    var url = '';
    if (event.action !== '') {
        url = event.action
    } else {
        url = event.notification.data.url
    }
    console.log("Will open URL: ", url);

    // Focus or Open
    event.waitUntil(
        self.clients.matchAll({type: 'window'})
        .then((allclients) => {
            for (const client of allclients) {
                console.log("... Looking client URL: ", client.url, " -> ", client.type);
                if (client.url === url && "focus" in client) {
                    return client.focus();
                }
                if (self.clients.openWindow) {
                    return self.clients.openWindow(url);
                }
            }
        })
    );
});
Nothing too complicated here. There are two more events we can capture.
self.addEventListener('install', (event) => {
    self.skipWaiting();
    console.log('Service Worker: Install...')
});

self.addEventListener('activate', (event) => {
    console.log('Service Worker: Activate...')
});
Now every server sent notification should make it as a notification on the client.
Unsubscribing
Here is the code to unsubscribe. Here we are just removing the service worker.
showLogs("Started unsubscribing...");
  swRegistration.pushManager.getSubscription()
    .then((subscription) => {
    if (subscription) {
      showLogs("Unsubscribing: " + subscription);
      subscription.unsubscribe()
        .then((rsp) => {
        showLogs(rsp);
      });

      return swRegistration.unregister();
    }
  })
    .catch(function(error) {
    console.log('Error unsubscribing', error);
  })
    .then(() => {
    // Remove from server here
    // Not implemented
});
Conclusion
So that’s a brief on how we implement push notifications on the browser. I will put the code on my github page. Hope you found this useful. Ciao for now!